Resources for Monoprice Delta Pro

By Jakob Dam

SuperSlicer profiles for PLA

(Last update: 26. of February, 2021)


THE FILE CONTAINS:

  • 1 machine profile for Monoprice Delta Pro
  • 1 material profile for PLA
  • 7 print profiles, tested on PLA
  • 1 STL-file for showing the front of the bed in the viewer


ATTENTION!

  • I have enabled that the machine profile can override the printer’s firmware. As a result, your firmware settings WILL be overwritten, so TAKE A BACKUP OF YOUR FIRMWARE SETTINGS before printing files sliced with any of these profiles.
  • I have modified my printer with the following:
    • BMG clone extruder (Triangle Labs)
    • Increased stepper driver vref to 1.15V
    • E3D Nozzle X, 0.4mm
    • PEX build surface (just slapped on top of the glass)
    • Rubber feet (half sphere for speakers)

Furthermore, my printer stands on a antivibration mat for washing machines. By having both the rubber feet and the mat, I get less noise and slightly less ringing.

  • If you have not increased your stepper driver VREF to at least 1V, you may experience layer shifts using these profiles. Adjust to lower acceleration and jerk values in the machine settings to accommodate for this. Since all Delta Pro’s are delivered with vref values that are vastly different (mine were 0.55-0.8V) I can only venture a guess. A relatively safe bet would be 2000 mm/s acceleration and 12 mm/s jerk.
  • If you have not changed your extruder to something more powerful (a dual drive such as the BMG clone I’m using), you may experience under extrusion. Adjust to lower max speeds in the print profile settings to accommodate for this.
  • If you have not put on a different build surface, your prints may slip from the build plate during printing unless you use hairspray, glue or tape – especially in the FAST and ULTRA profiles, as they exert a greater pull on the model.
  • This should go without saying, but your filament is probably different from mine. Adjust temperatures and other values for the filament you use. As I use E3D Nozzle X, I need to bump up temperatures around 5-7 ºC from what I would normally run. As the faster profiles require a more consistent and errorless flow, I further bump the temperature up by 3-5 ºC. Thus I land on 210 ºC print temperature with 220 ºC for the first layer due to this giving a better grip on my PEX surface. My filament is rated for 185-230 ºC, so use this as an indicator to see how you should adjust for the filament you use.
  • DO NOT use filament of poor quality with the FAST and ULTRA profiles, as impurities can very quickly clog your hot end. I use Spectrum Filament and 3DE. Even their low cost versions are fine for these profiles – but I’ve seen some horrifying examples where people found large blobs of what looks like corn or boogers in their cheap filament.
  • IF YOU HAVE AN UPGRADED HOT END (such as E3D V6 or E3D Volcano) you can adjust the “max volumetric speed” up for all profiles. This often won’t do much as most print cases are not flow limited – however, there is one profile in particular which IS flow limited: Vase mode. In vase mode, the extrusion must be continuous and consistent, and that’s why I adjusted the max volumetric speed all the way down to 9 mm3/s – as that’s the maximum that our stock hot ends can supply. I’ve only tested using the PTFE lined hot end, but I suspect the all-metal won’t fare much better. E3D V6 should be able to consistently go up to at least 15 mm3/s while the Volcano should be able to hit 25 mm3/s or higher. This would enable an insane max speed and since vase mode often doesn’t do much in terms of acceleration and jerk (actually that depends entirely on the model), I suspect you could run at 170-220 mm/s if you have this upgrade.
  • DO NOT EXCEED 230 mm/s SPEEDS / 5500 mm/s acceleration / 27 mm/s jerk! This goes for move speeds too. No matter what upgrades you have, unless you have upgraded the magnets themselves, the bars will be pulled off from the delta carriage. I’ve chosen to go the “safer” route with my machine settings – so we have 5200 mm/s as acceleration limit, 25 mm/s as jerk limit and… 300 mm/s as movement limit. However, all the profiles cap at 170 mm/s or slower, most of them around 130 mm/s.

About the 7 print profiles:

  1. “0.1mm PRECISION”
    • Very slow profile due to low layer height and low speeds.
    • Meant for miniatures and cases where precision over speed is preferred.
    • Primarily meant to be able to consistently print high quality detailed miniatures at around 4-6cm tall, where high speeds could easily rip the print apart and cause the support to fail.
  2. “0.15mm STATUETTES”
    • This is a medium-speed primarily meant for precision work where the part is 6cm tall or larger.
    • For some statuettes, the speeds here may be too much; but in general, most statuettes and precision parts will be able to print fine with no issues even if the speeds look high and it looks a bit violent down on the build plate.
    • The faster speeds make it much less tedious to use this lower height, so you get added detail and precision without sacrificing too much print time. 
  3. “0.2mm MEDIUM FAST”
    • Fairly fast profile for generic use with the popular 0.2mm layer height.
    • I consider this my “fail safe” profile although the speeds are probably in the higher end of what others run at. However, I have not seen anything than justify lower speeds in terms of quality. Only overhangs may improve from lower print speeds due to the poor stock cooling, but I have adjusted for this in the print profile itself, as SuperSlicer gives precise control for the speed of overhangs and bridges.
    • This profile is too fast for very delicate precision work, but in these cases, you probably won’t want 0.2mm layer height anyway.
    • In general, lower print speeds provide more durable parts, so if stress durability and tensile strength is what you need, this profile is actually the fastest I’d recommend you use. You may even want to adjust those speeds to around 40-50 mm/s tops.
  4. “0.2mm FAST”
    • This is a fairly fast profile which most people should be able to run with no issues regardless. 
    • I usually slice my prints with this profile or with settings based on this profile, where I only adjust minor details to optimize for the specific part. Although much faster than your average cartesian printer, you should not experience layer shifts with this profile unless you’re unlucky and your steppers are stock tuned to way too low. 
  5. “0.2mm ULTRA FAST”
    • This is actually why you’re here. Life at 170 mm/s print speed and full 5200 mm/s acceleration and 25 mm/s jerk is wonderful. 
    • This profile is violent and will probably require your stepper drivers to be tuned in at 0.8V or higher – probably 1.0V or higher. I run at 1.15V. 
    • This profiles will complete a Benchy in 36 minutes. 
    • I can print consistently with this profile even though the speeds are high; however, obviously you shouldn’t be too concerned about quality when using it.
    • You will probably get stringing like I did. Even though I’ve made several adjustments to lower the stringing tendencies, at these speeds, you get it anyway. 
    • You will get corner bulges. These high speeds will deliver a bit more filament to the corners and I may be able to adjust for that in the future.
    • Quality is actually not too shabby; and compared to the “ULTRA FAST” profile I made in PrusaSlicer, this version makes nicer overhangs and bridges along with slightly better surface quality.
  6. “0.2mm VASE”
    • Without a doubt the most troublesome profile I’ve ever made.
    • It took me quite a while to accept that I had to lower the print speed so much and realize why. Since I’ve chosen 9 mm3/s as max volumetric speed, you will actually not even hit the speed that I’ve put into the “Speed” section. 
    • This profile makes a VERY thick wall. Obviously, with a bigger nozzle such as 0.6mm or 0.8mm, you can have an even thicker wall. But this actually creates very nice vases with a good surface quality and thickness.
  7. “0.3mm FAST”
    • This is meant as a draft mode, but I tend to use it for things I also use – such as small drawers for parts storage.
    • At times you will see that the 12 mm3/s max volumetric speed is a bit optimistic – so some walls may be under extruded depending on how your part looks. However, it will hold. Adjust to 10 mm3/s if you want to play it a bit safer to get nicer surfaces.

Download zip
(49 KB)

Time lapse of Benchy   |   Profile: “0.2mm ULTRA FAST”   |   Print time: 36 minutes:

Close-up images of the Benchy shown in the above time lapse (click to enlarge):

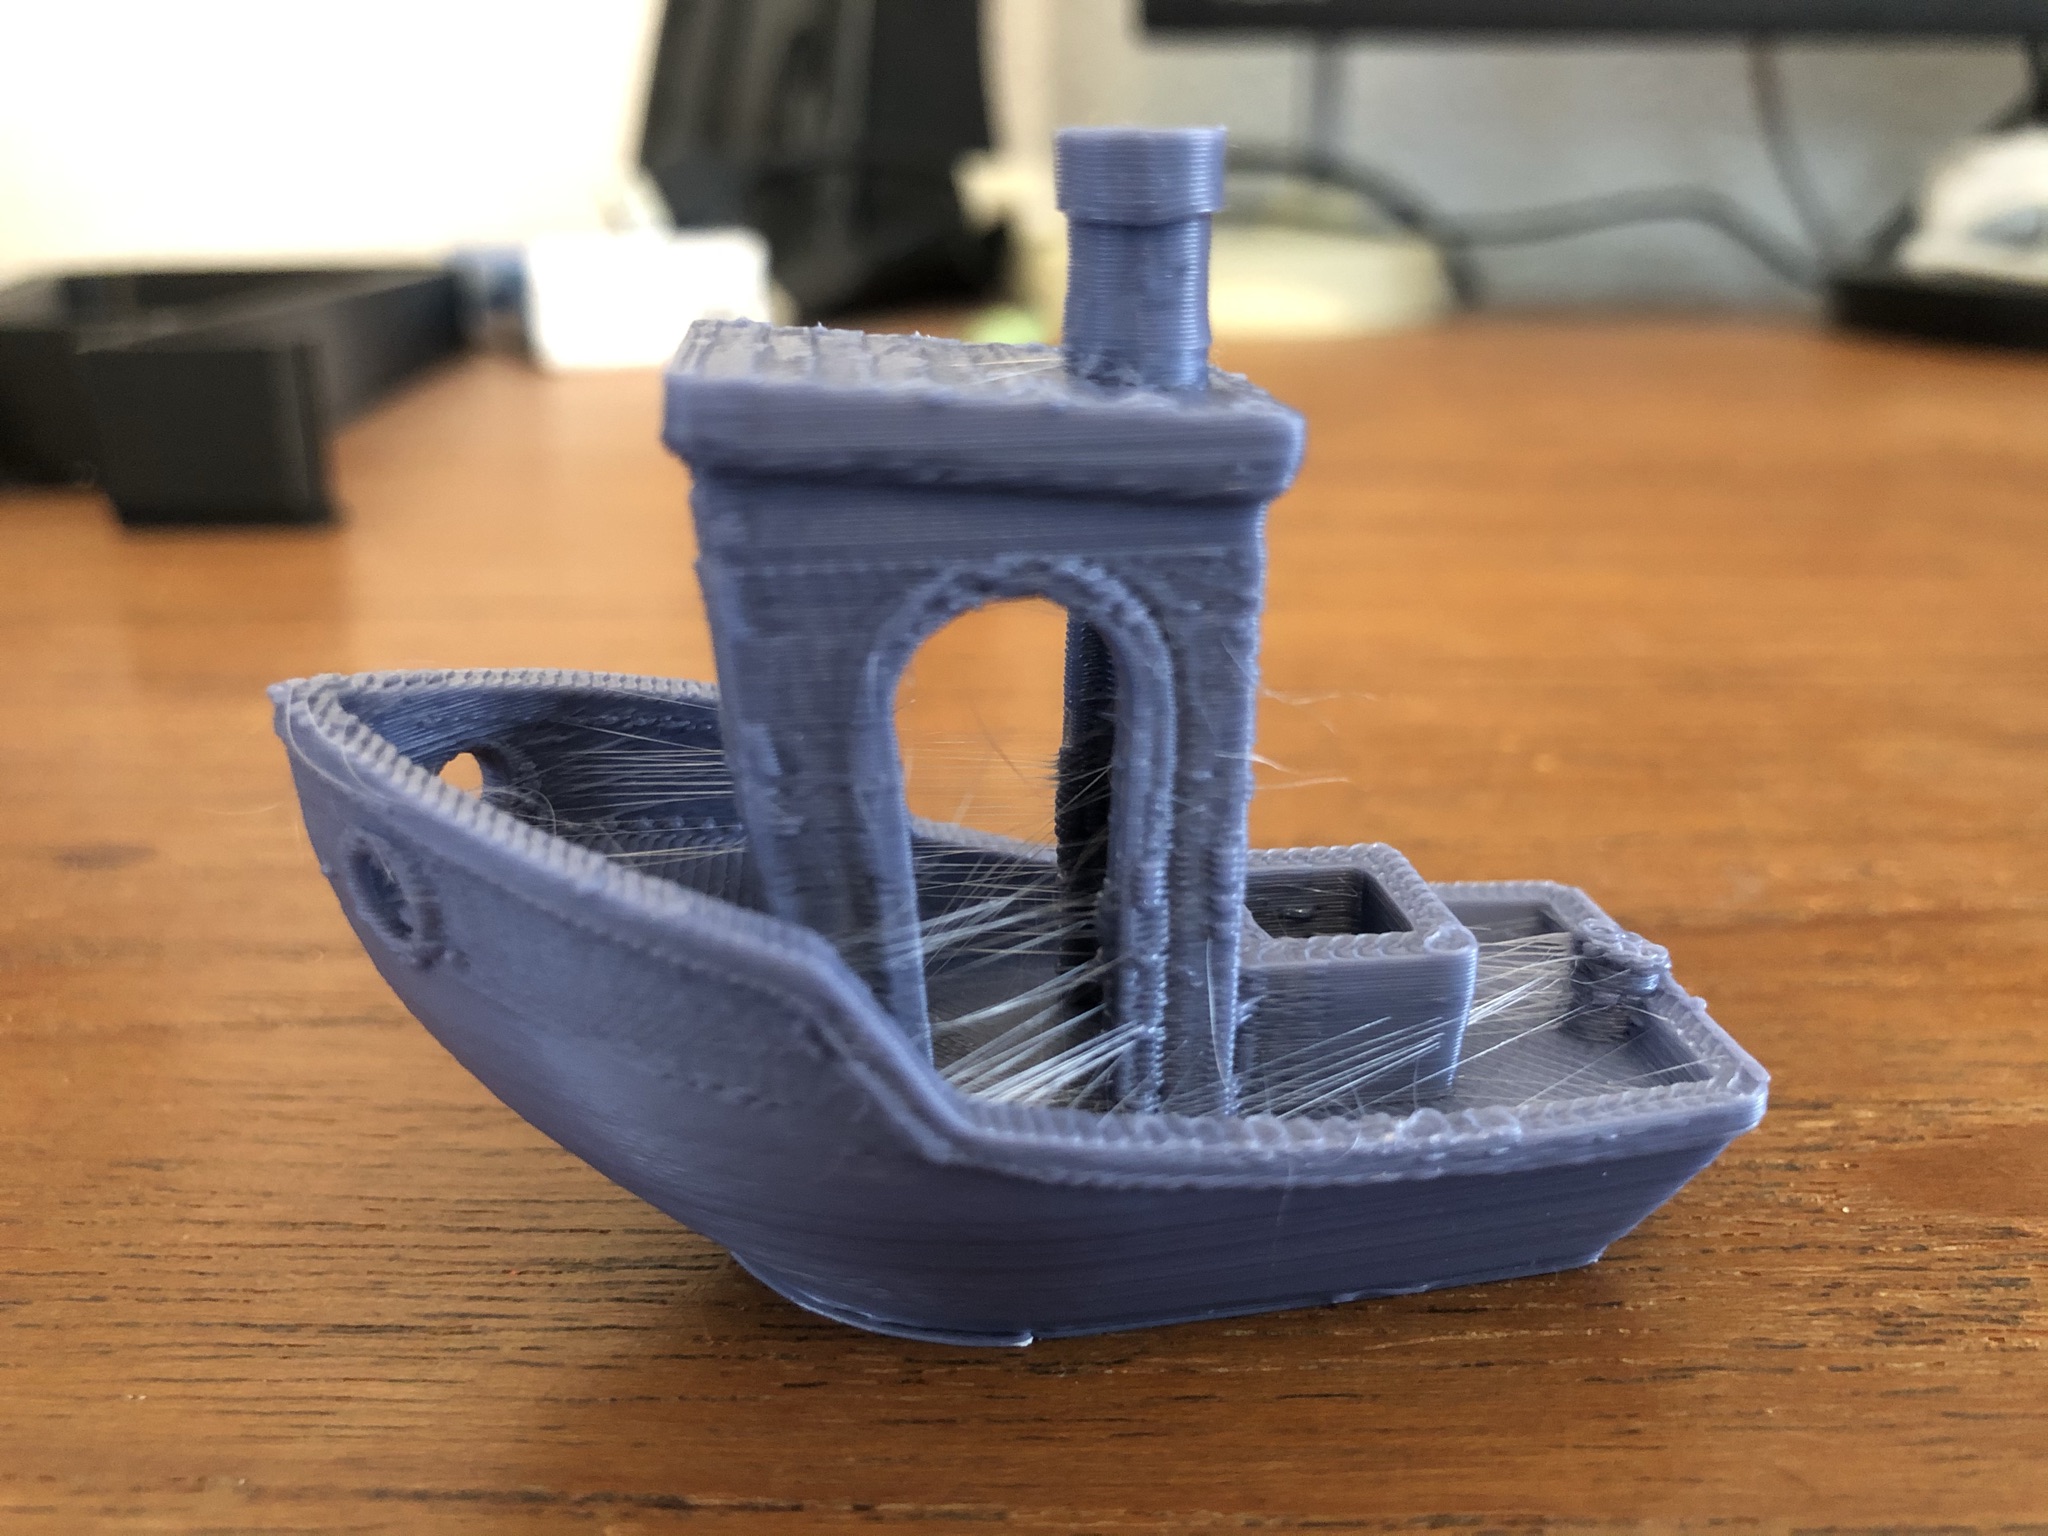
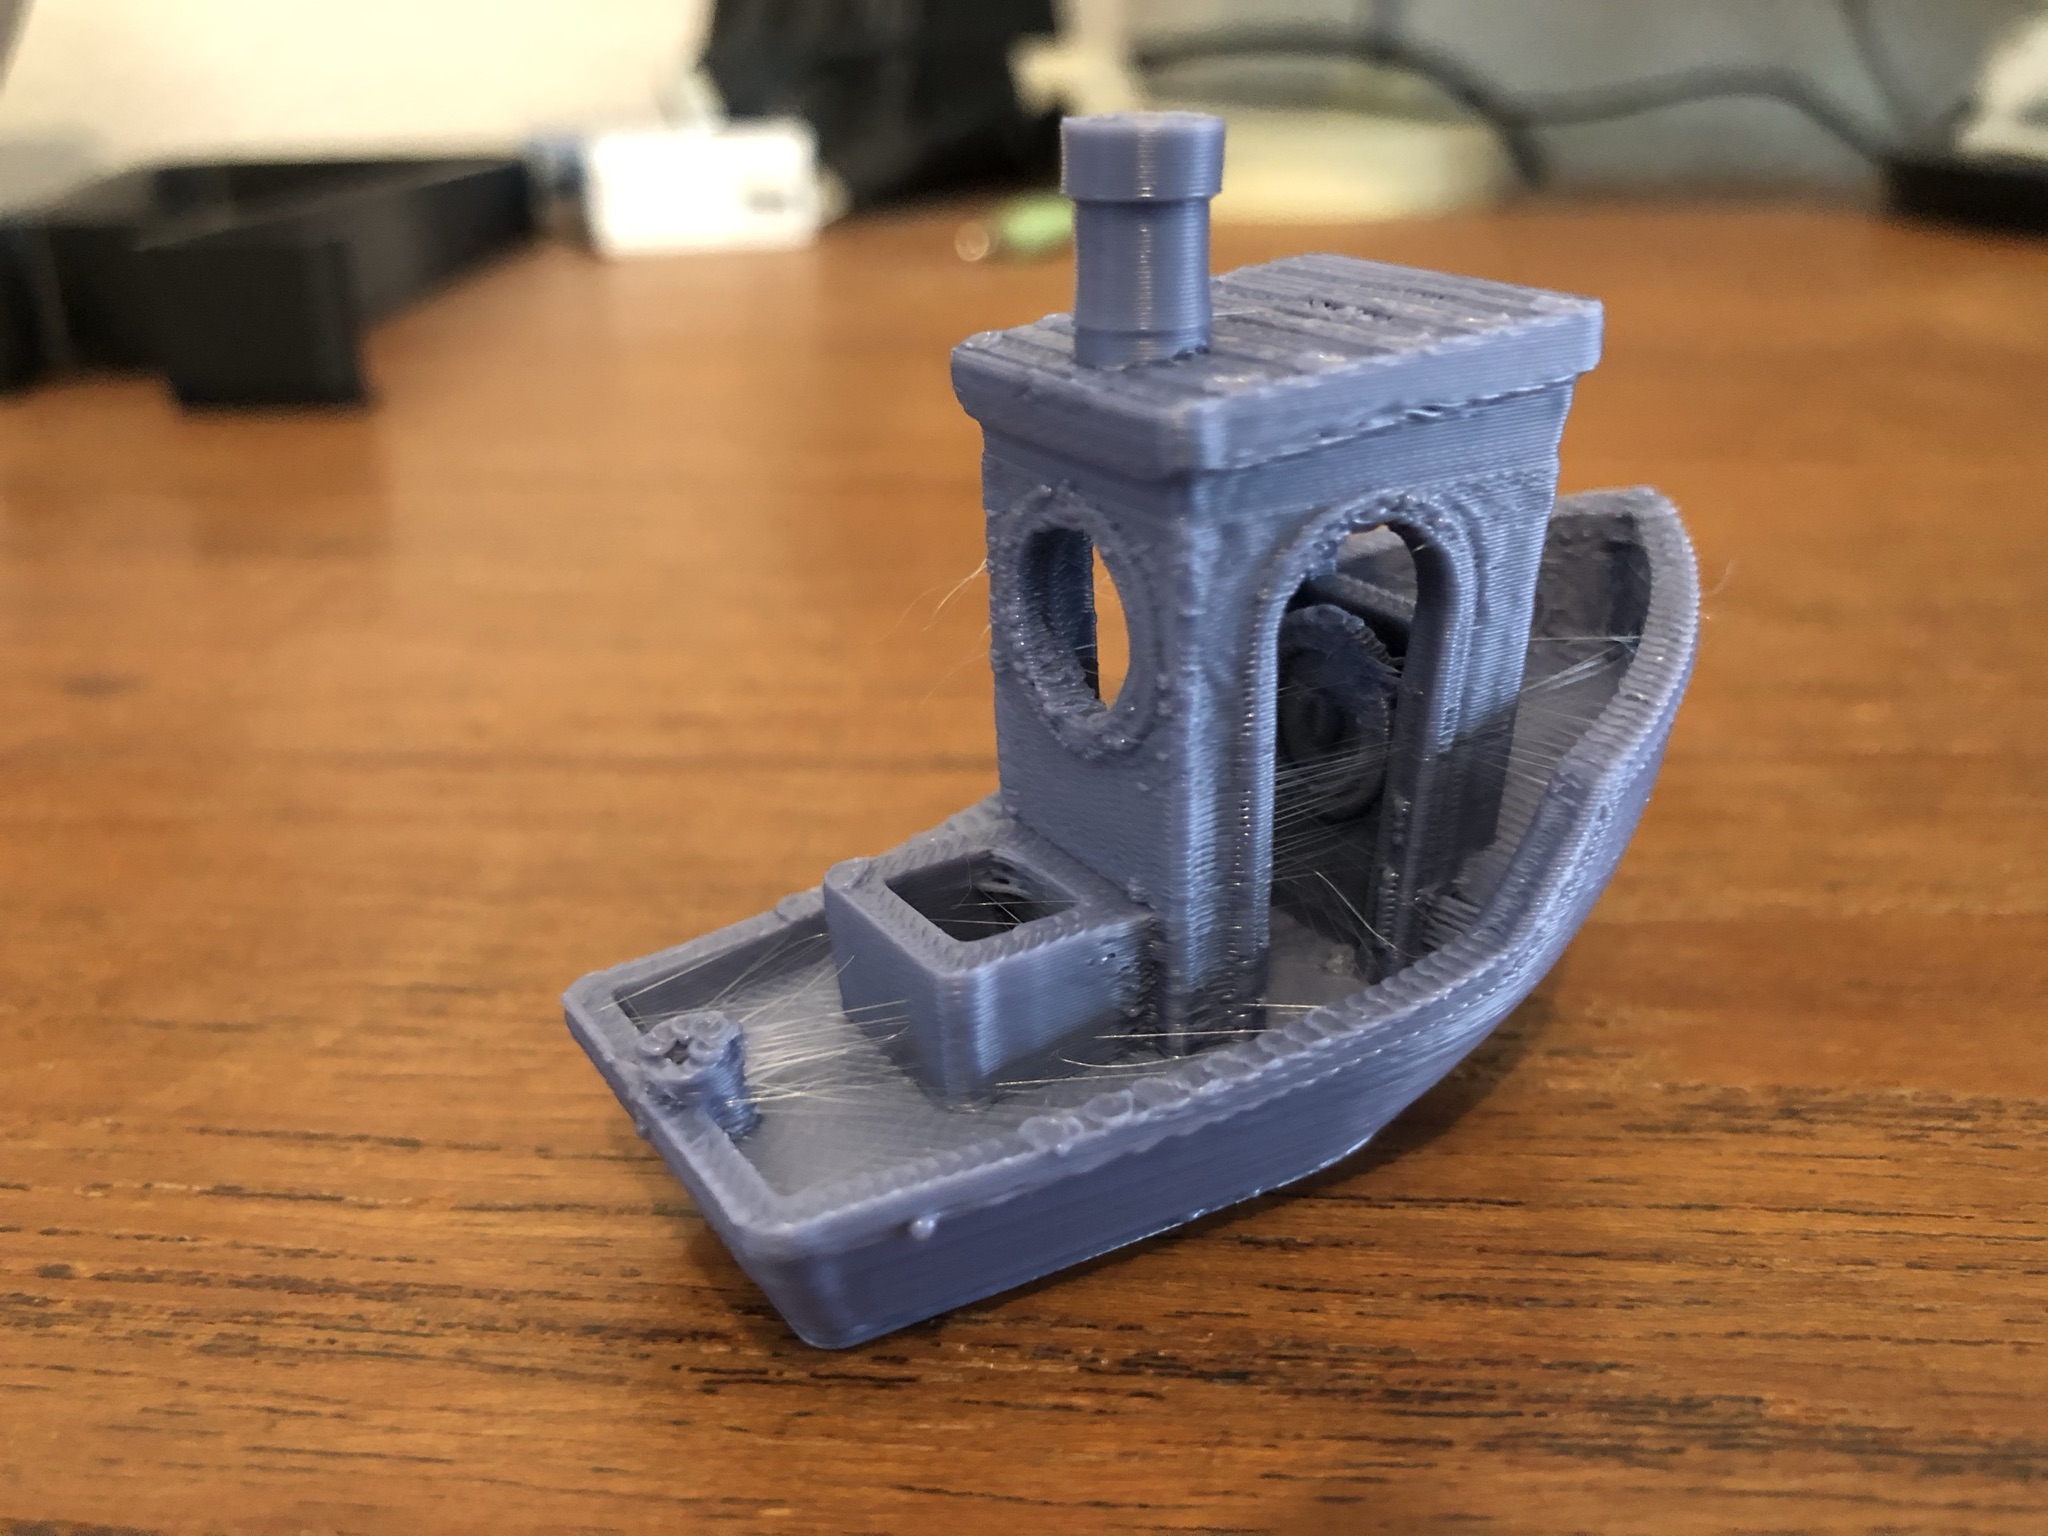
NOTES: This is the fastest I can go as of now. Faster than this will create more issues. The roof is already lacking which may be due to lack of material, so the hot end is probably to blame here. Very fine details on the bottom of the Benchy, and generally an ok surface although the ringing is very evident some places. The holes are too small due to me making a mistake with horizontal hole expansion – this is rectified in the profile provided here.

Link to STL

Model printed at 100% size.


Elf Archer Bust   |   Profile: “0.15mm – STATUETTES”   |   123 minutes:

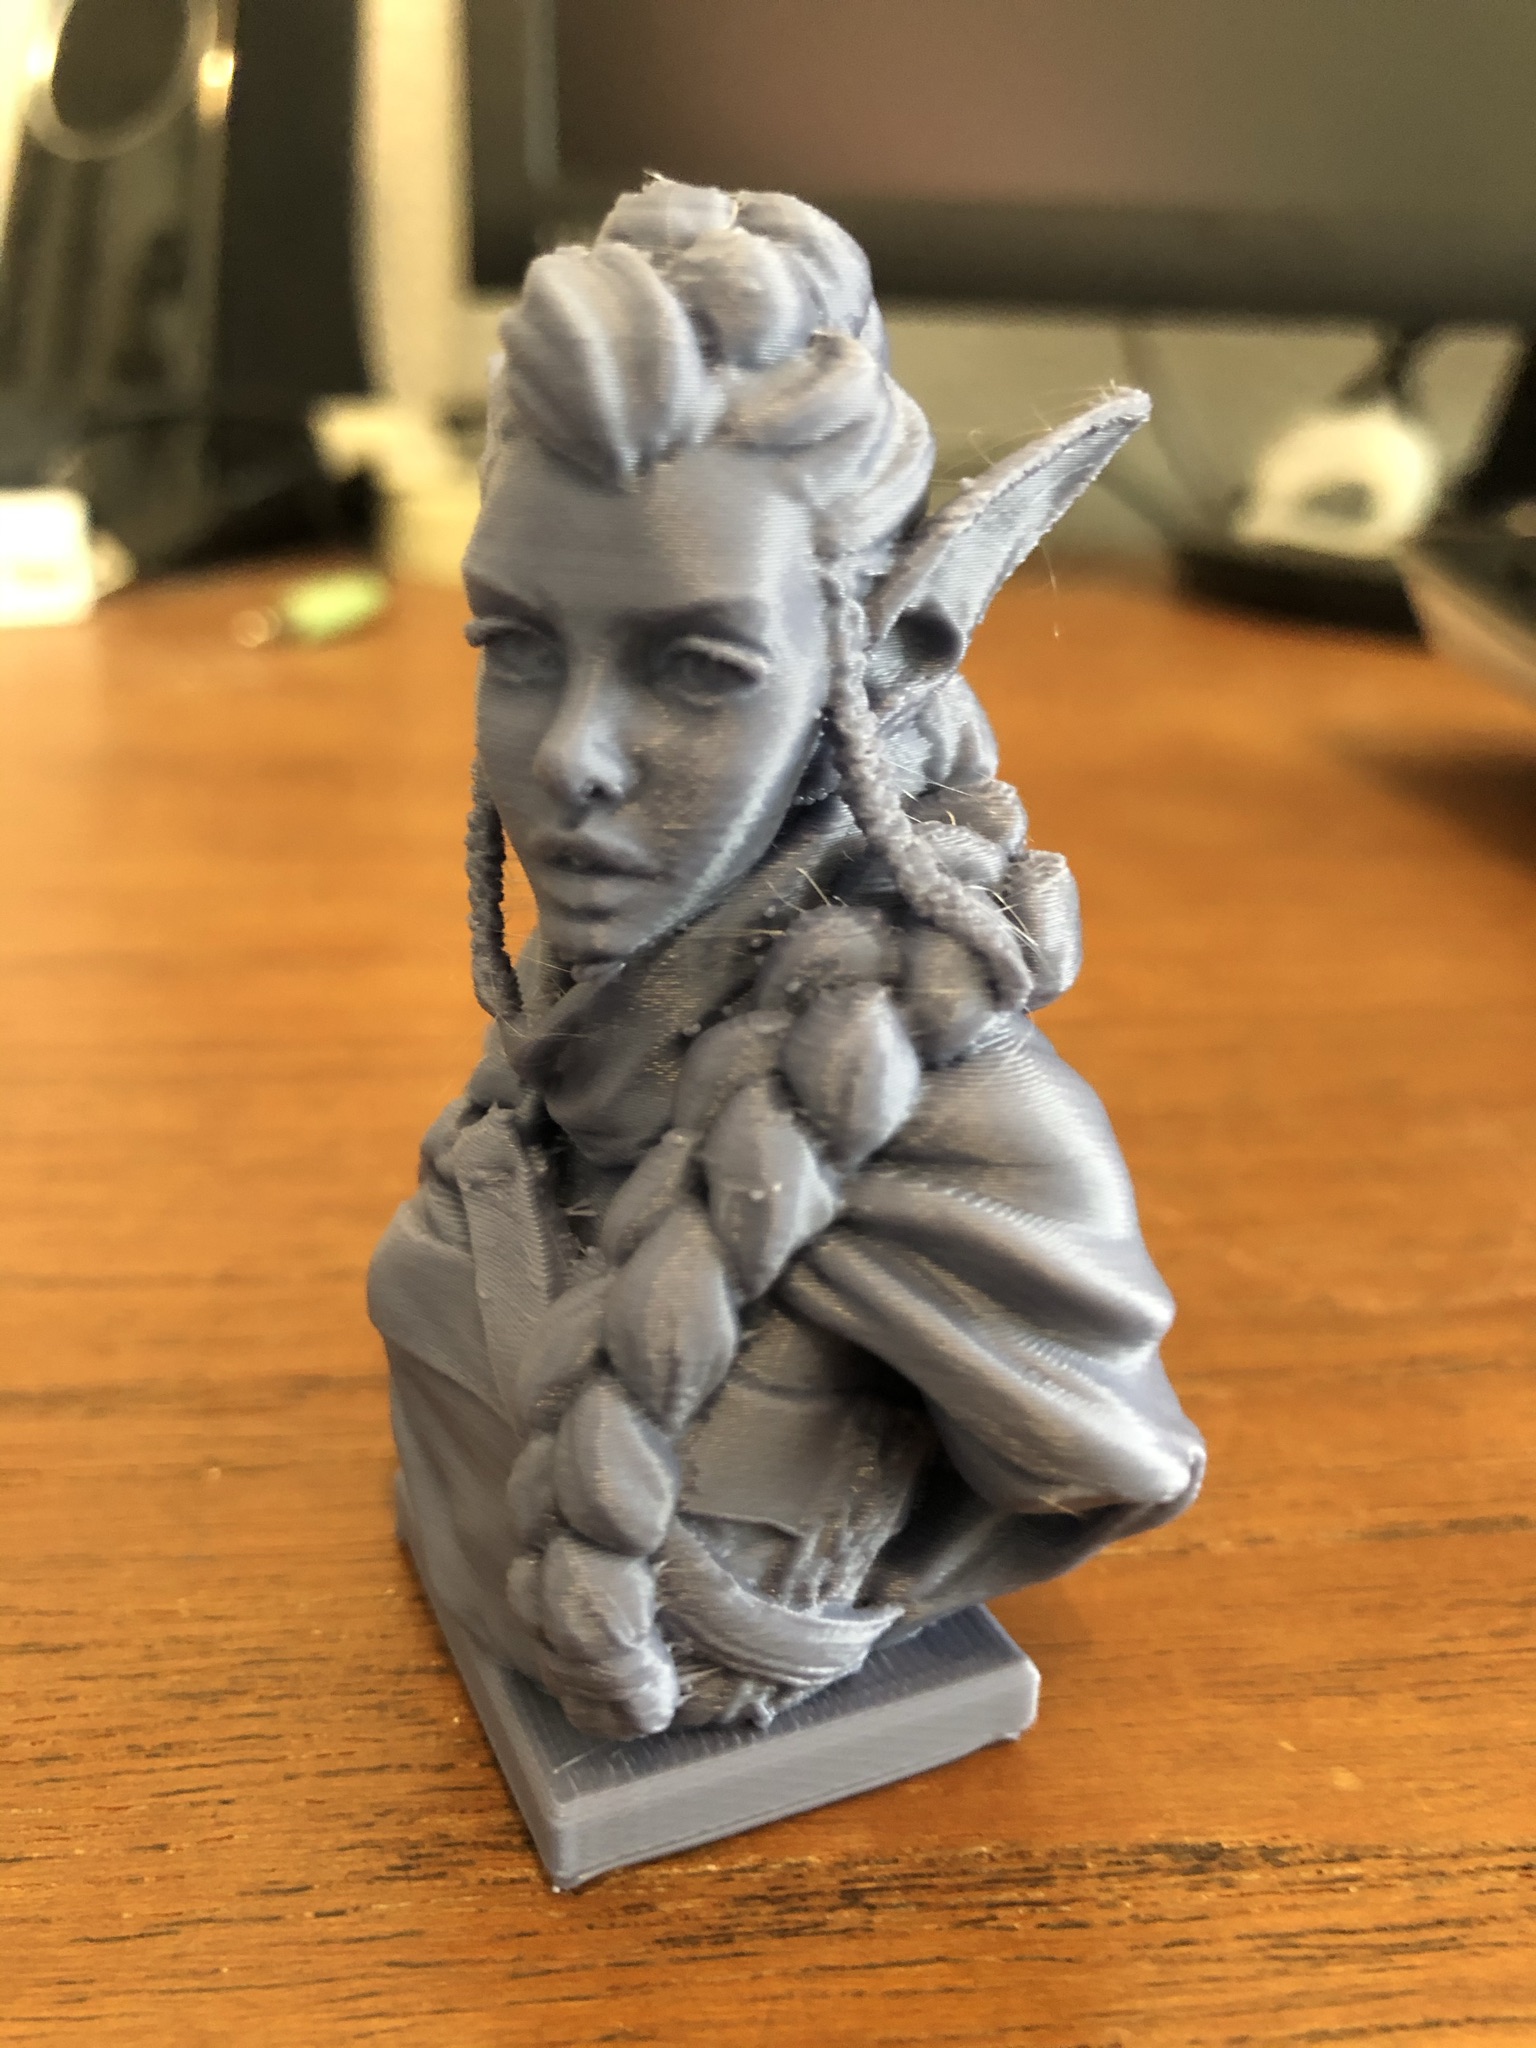
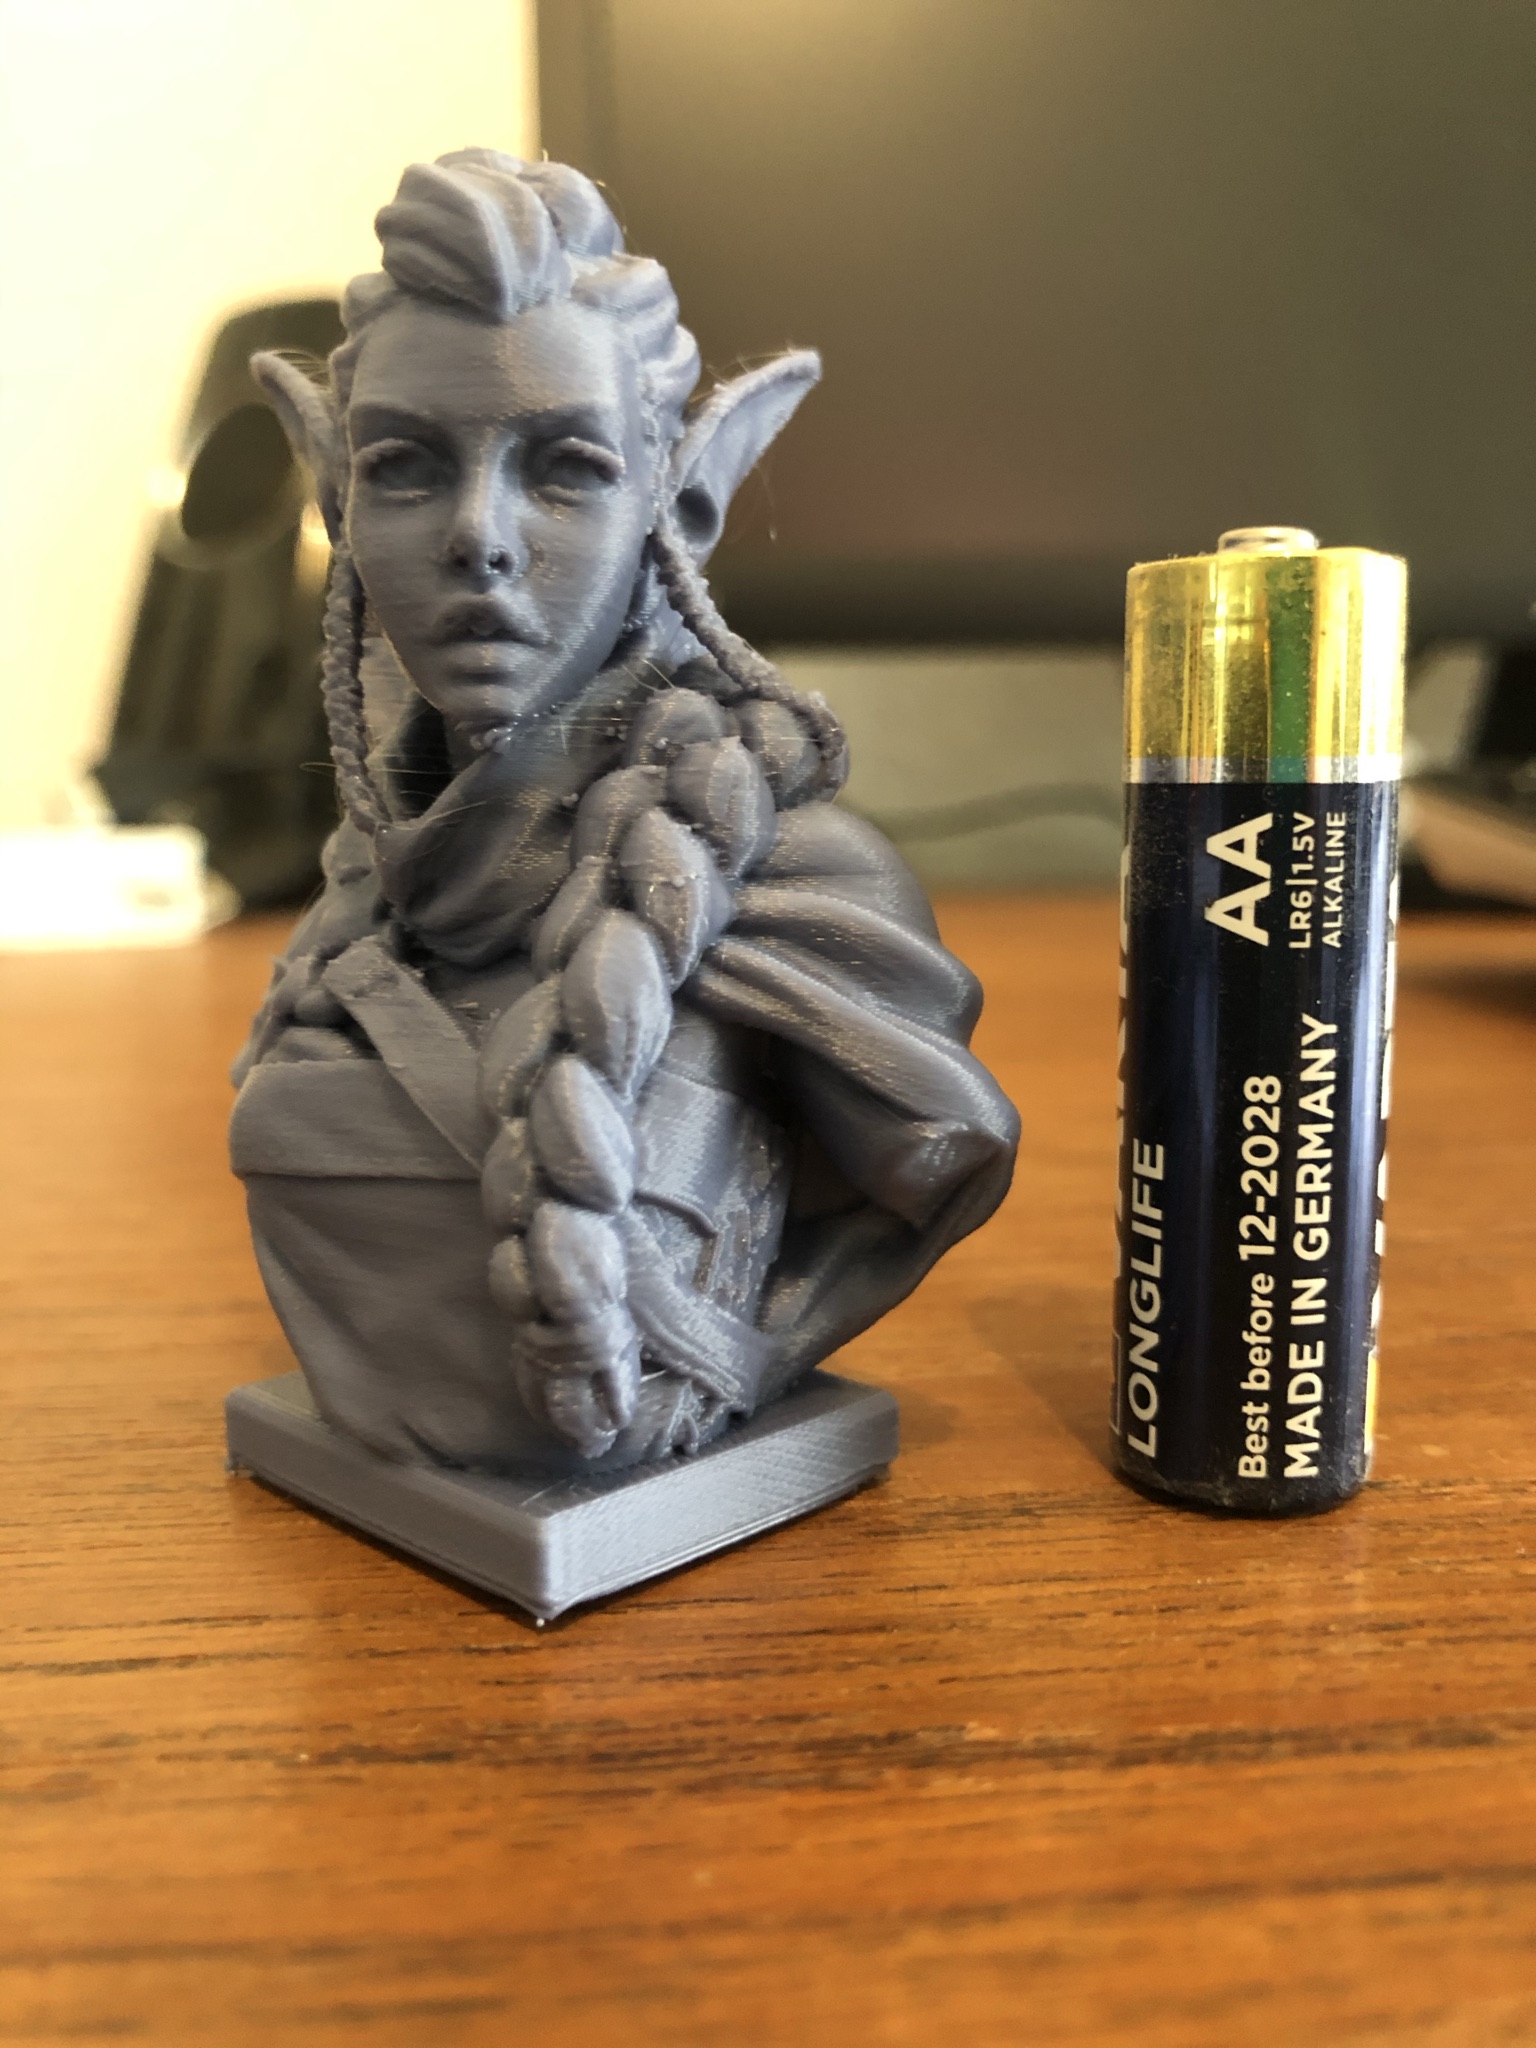
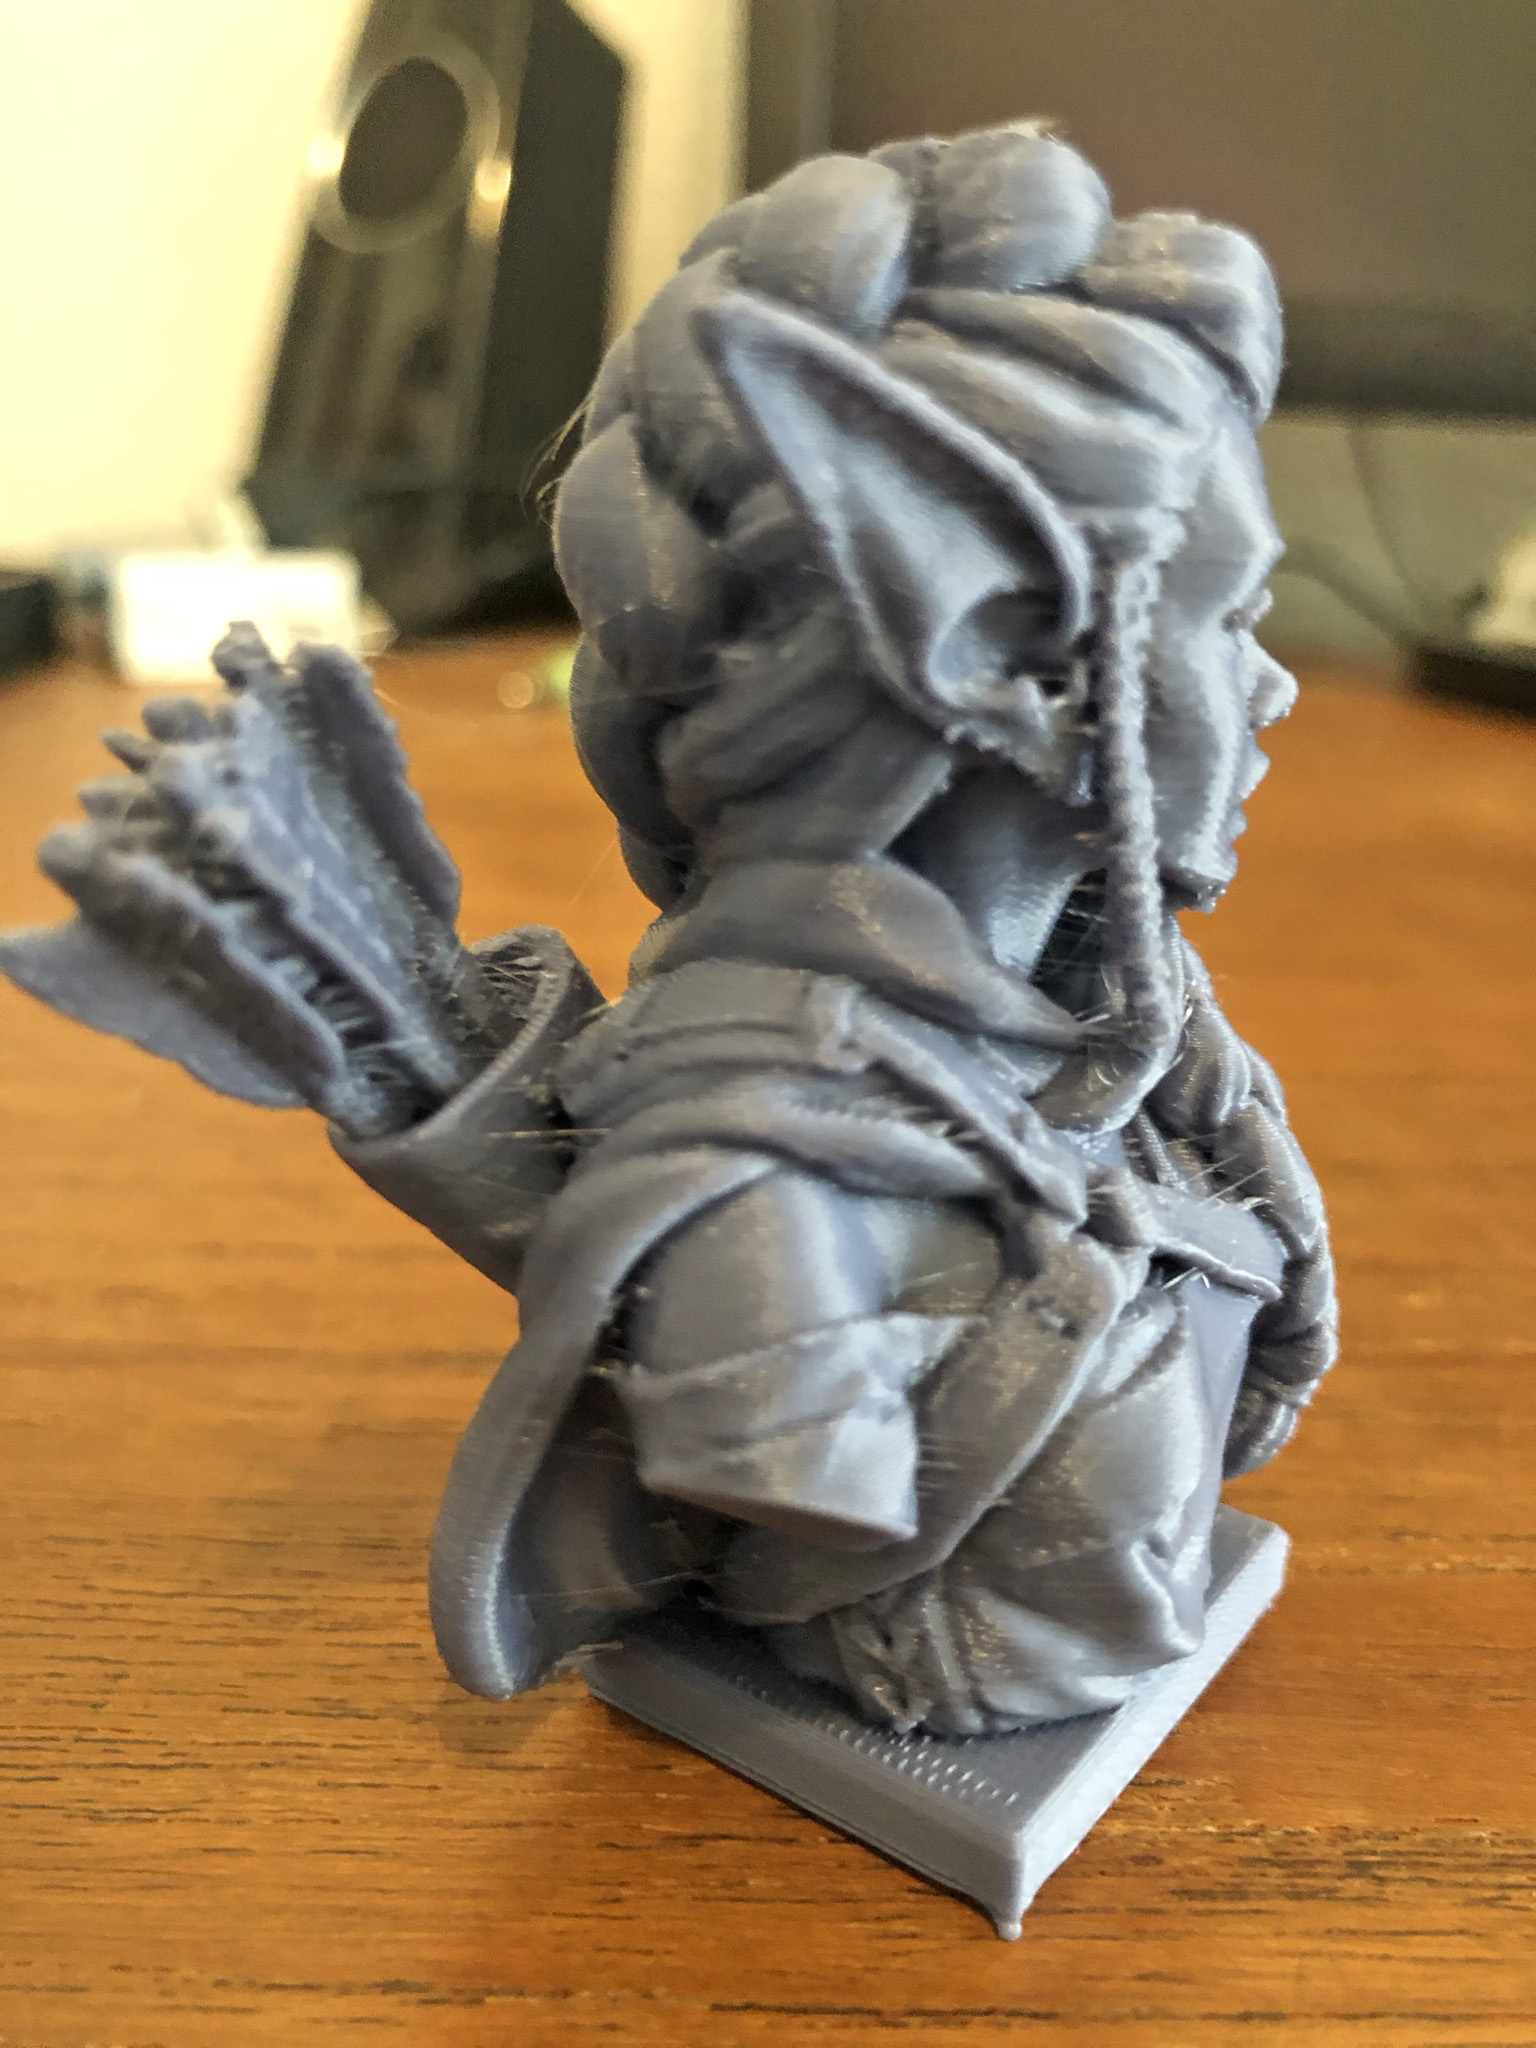
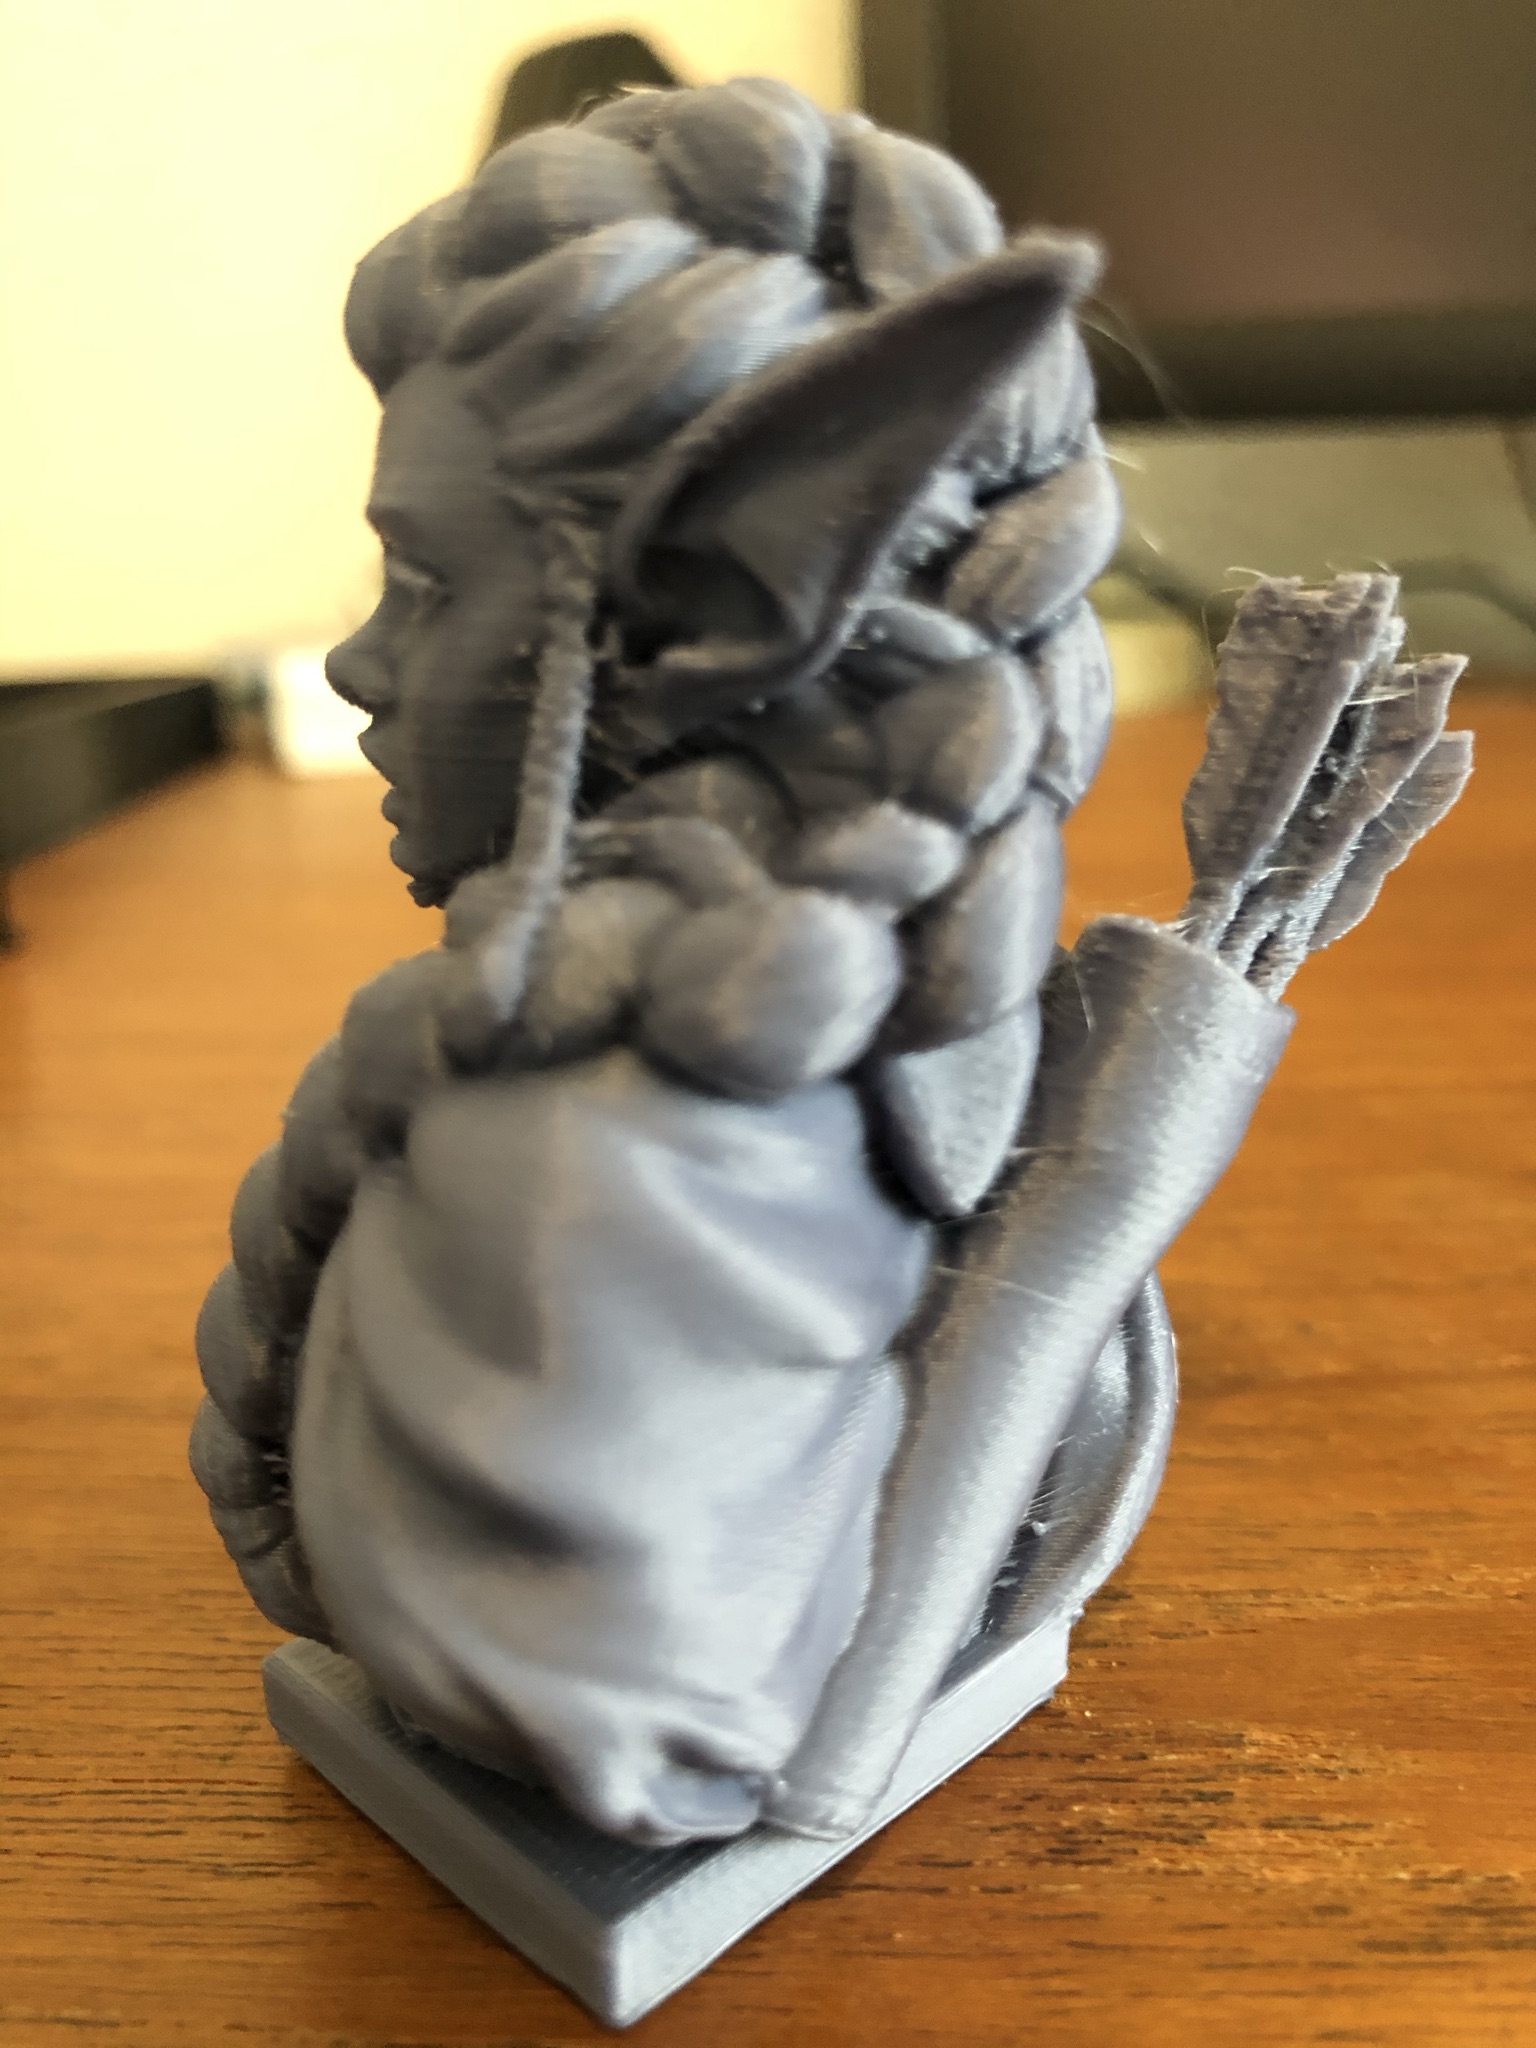
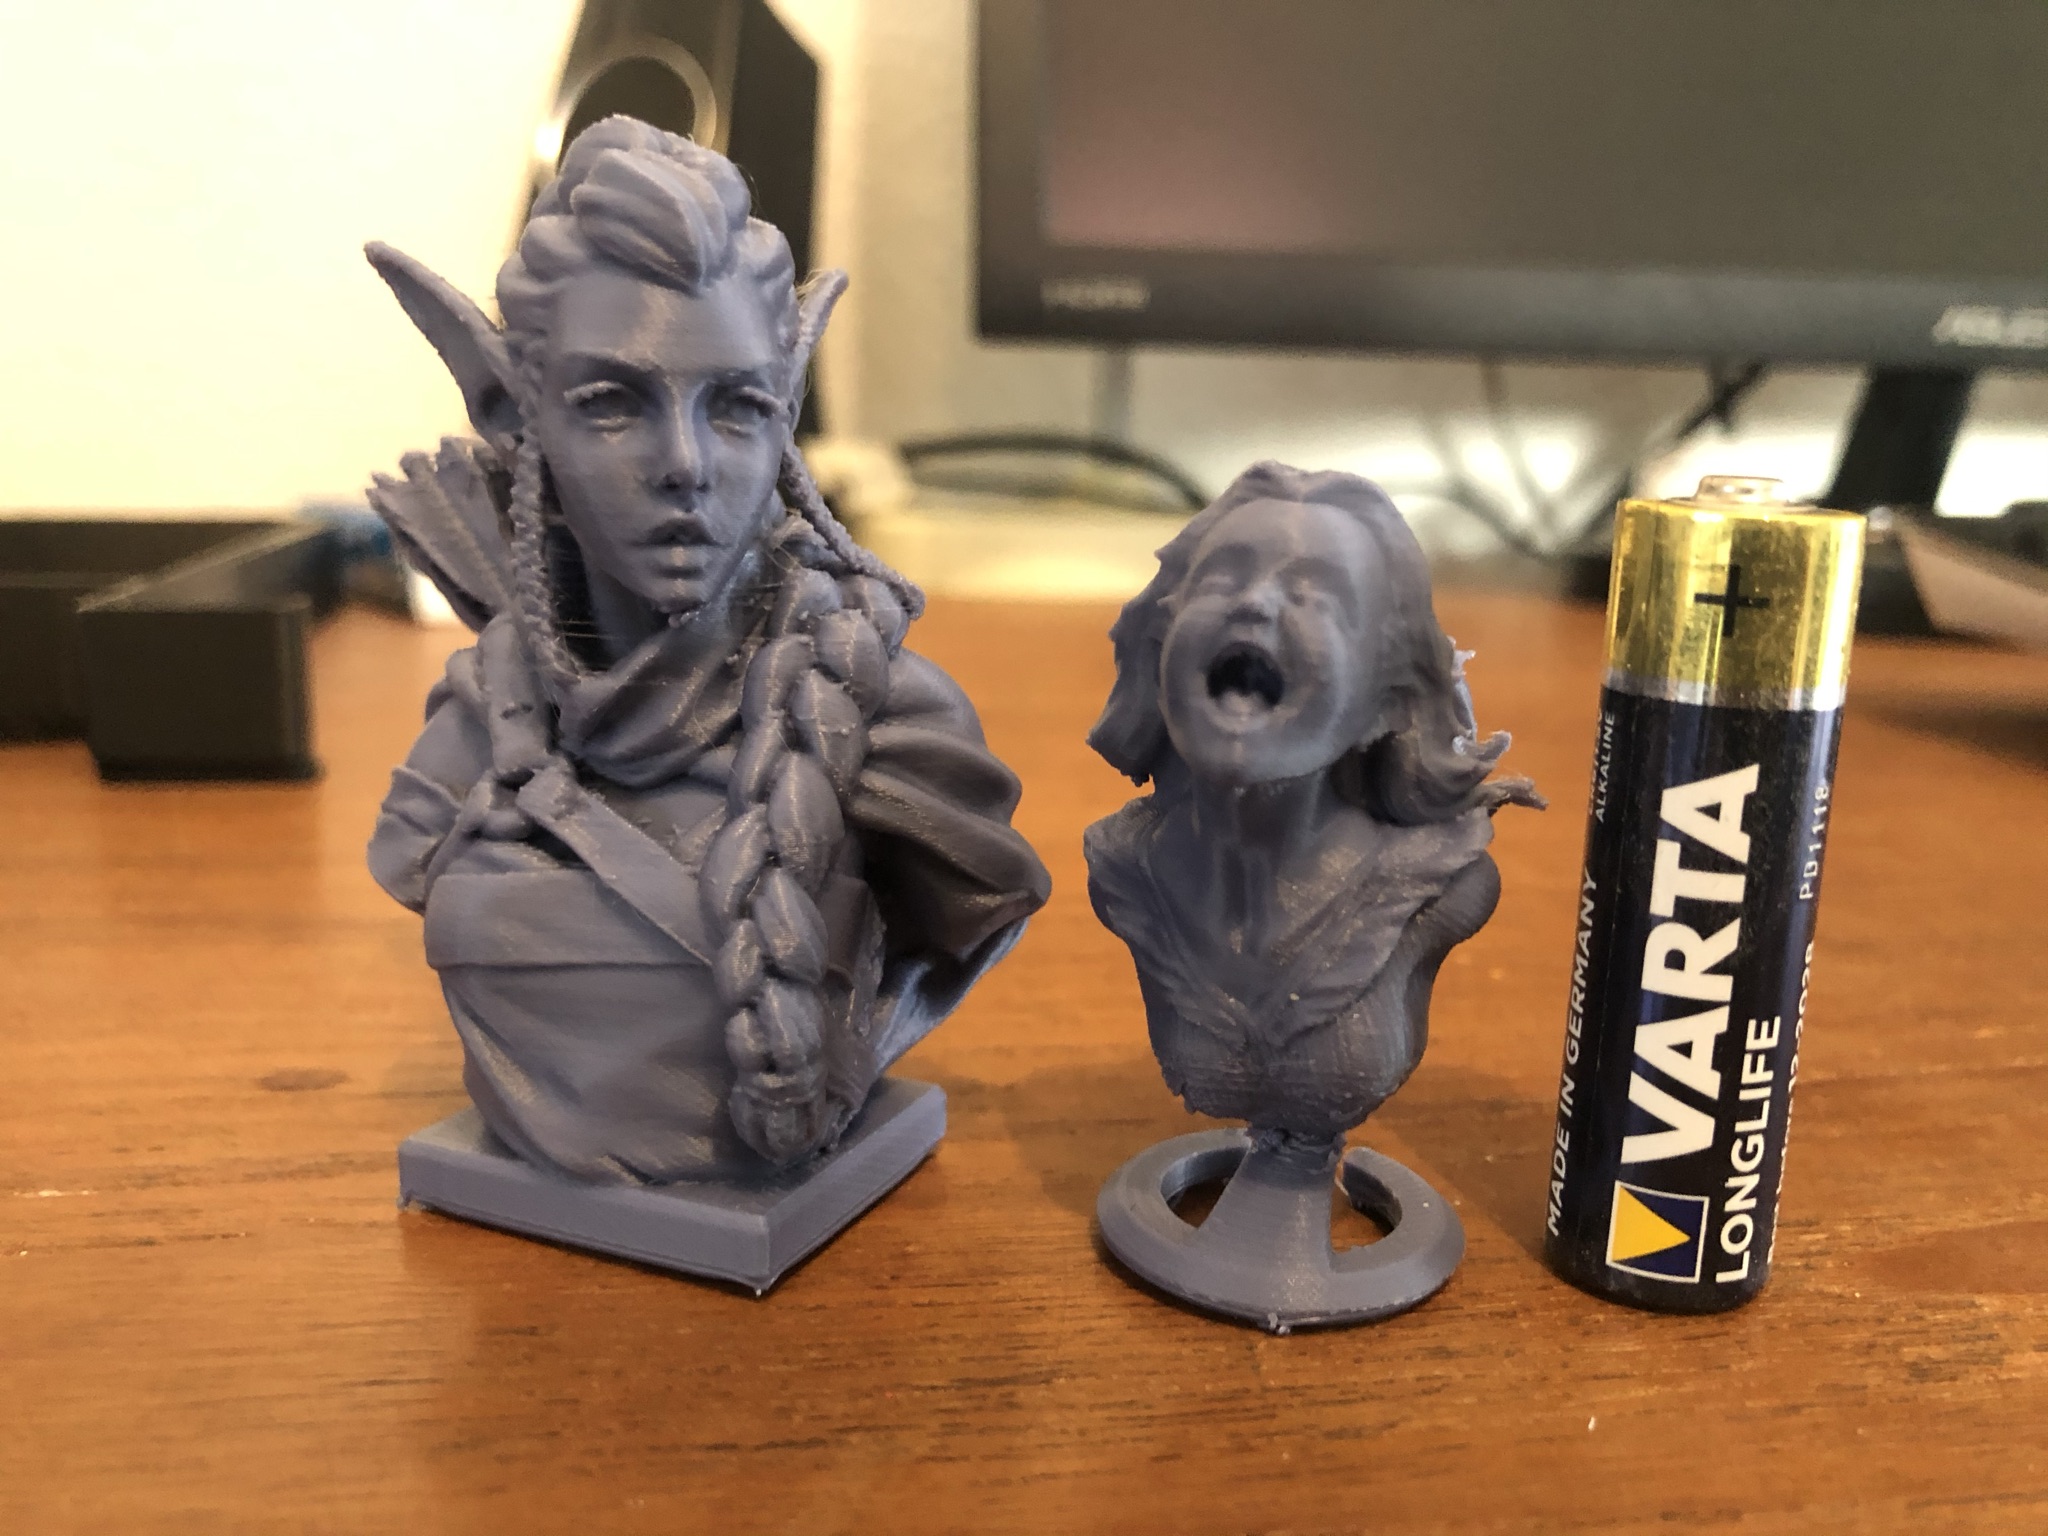
NOTES: This is an example of the level of detail that the “0.15 – STATUETTE” profile delivers. Layers are almost invisible in most places. The tiny wisps of stringing are easily removed for a quick clean-up. A battery is shown for size comparison. Note the amount of details in the braids and arrows. The unsufficient part cooling is a bit evident on the inside of the ears and underneath the chin. This may be solved by setting bridge speed slower than the 50 mm/s that I chose for the profile – I believe 35 mm/s would be fine if you need to really make a fine statuette, but I also believe that most people won’t notice as it’s not really an obvious issue – and a quick filing will rectify the few areas that may need work.

Link to STL

Model printed at 114.68% size (7.0 cm height).

The Joyful Yell   |   Profile: “0.10mm – PRECISION”   |   92 minutes:

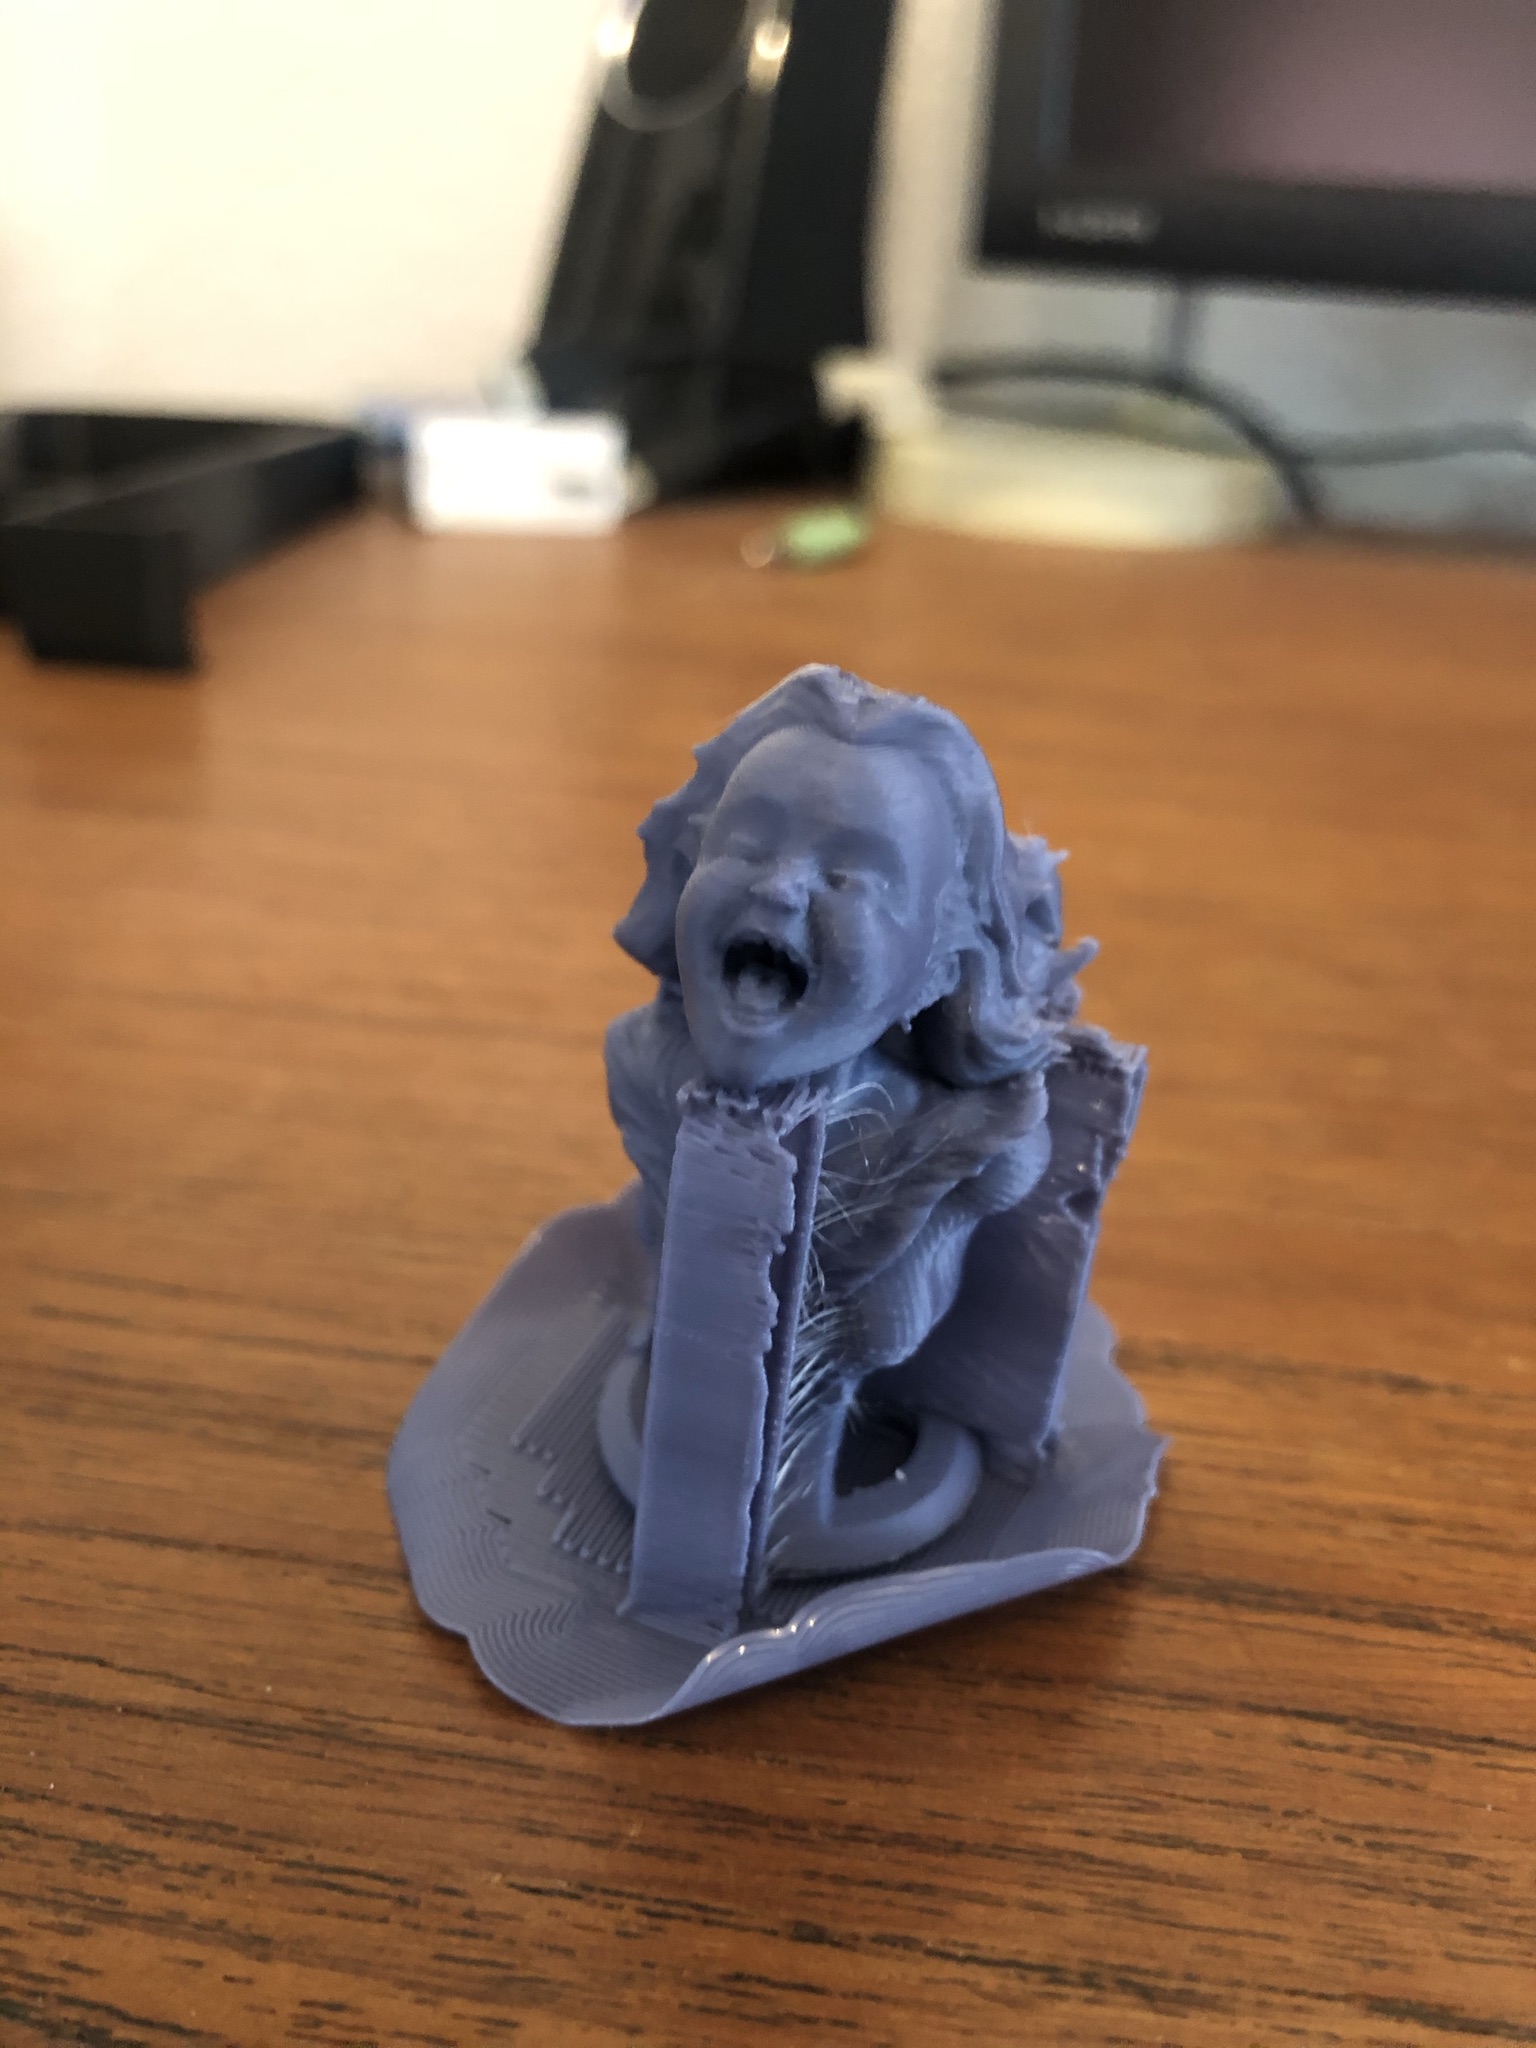
NOTES: This is an example of the level of detail that the “0.10 – PRECISION” profile delivers. Layers are quite invisible in general and details are really good. I changed the support a bit from the profile, and optimally you should do that too to accommodate the specific model you’re printing. What I changed was a minor thing though; I put in a lower value for support “Overhang treshold”, running at 10º rather than the 27º that the profile is loaded with. This was to have much fewer places with support – for a faster print time and less trouble removing unnecessary support. Although this profile runs slow (which for a cartesian would be the higher end of normal speed), it finished printing in just 92 minutes. 

The super clean skin is impressive, especially considered that she’s so much smaller than the small elf archer. AA battery for size.

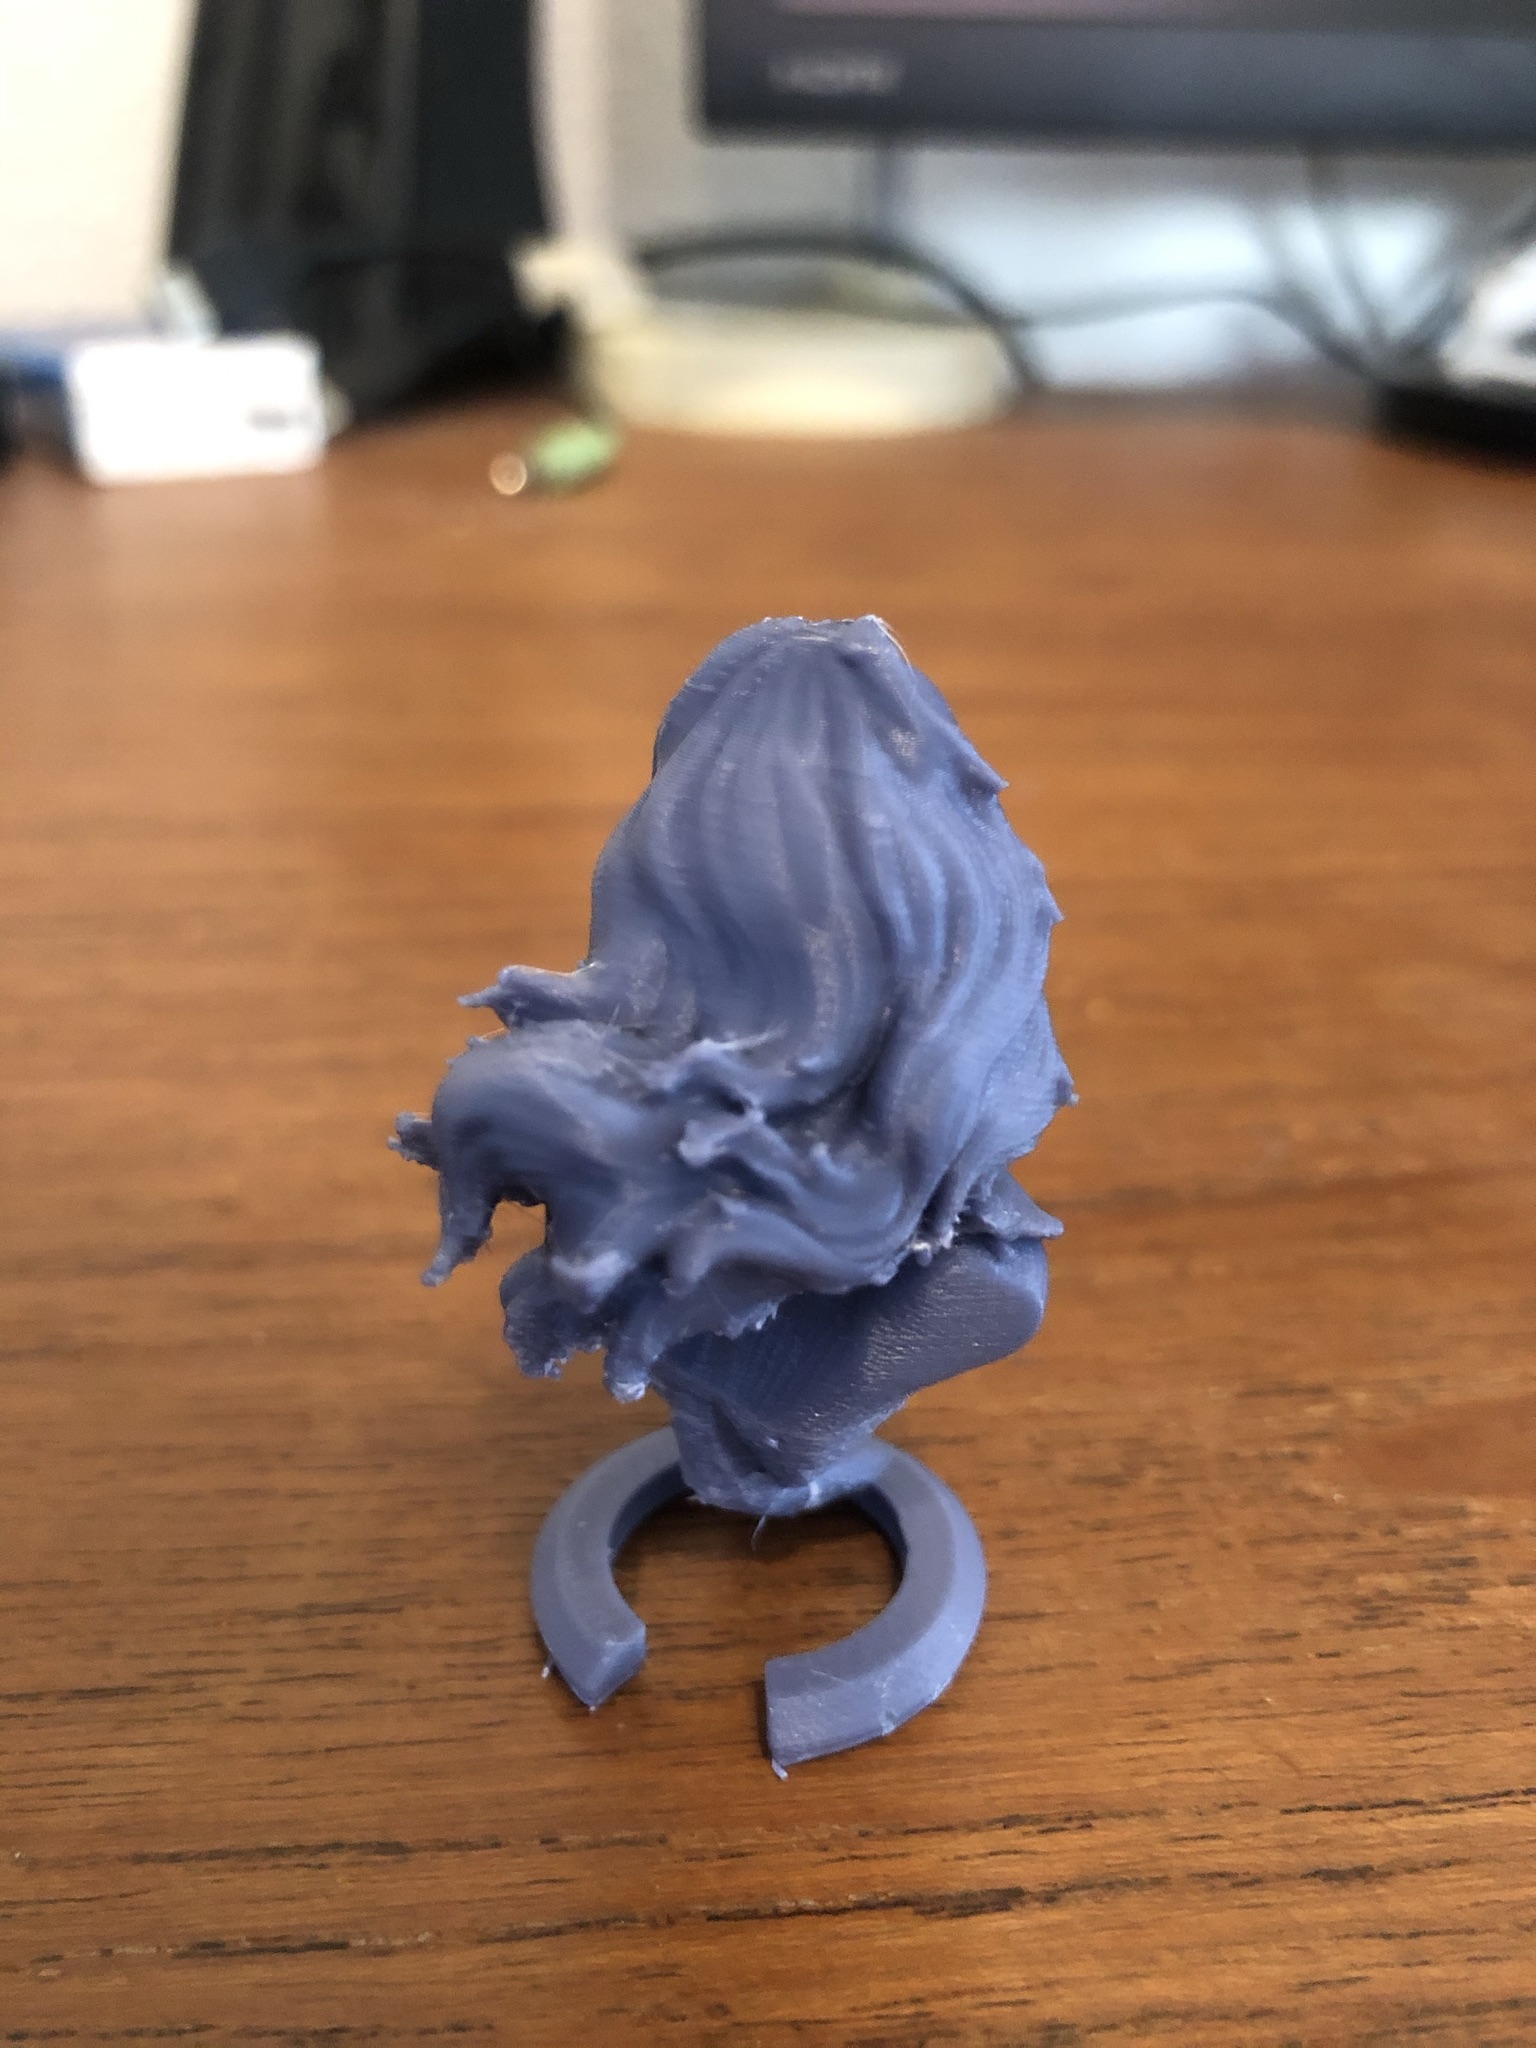
A minor issue underneath her boobs, where the support didn’t go quite close enough. This is due to my profile setting for how close the support must get, and if I change it to go tighter, the support will become too hard to remove for my taste, and leave more break points than what you can see on her hair’s ends. The break points that are there now are minor; easy to buff out. But if they get larger, you may end up breaking stuff off your print. 

Link to STL

Model printed downscaled to 5.0 cm height.

LFS Elephant (Long Flare Tail)   |   Profile: “0.2mm – MEDIUM FAST”   |   93 minutes:

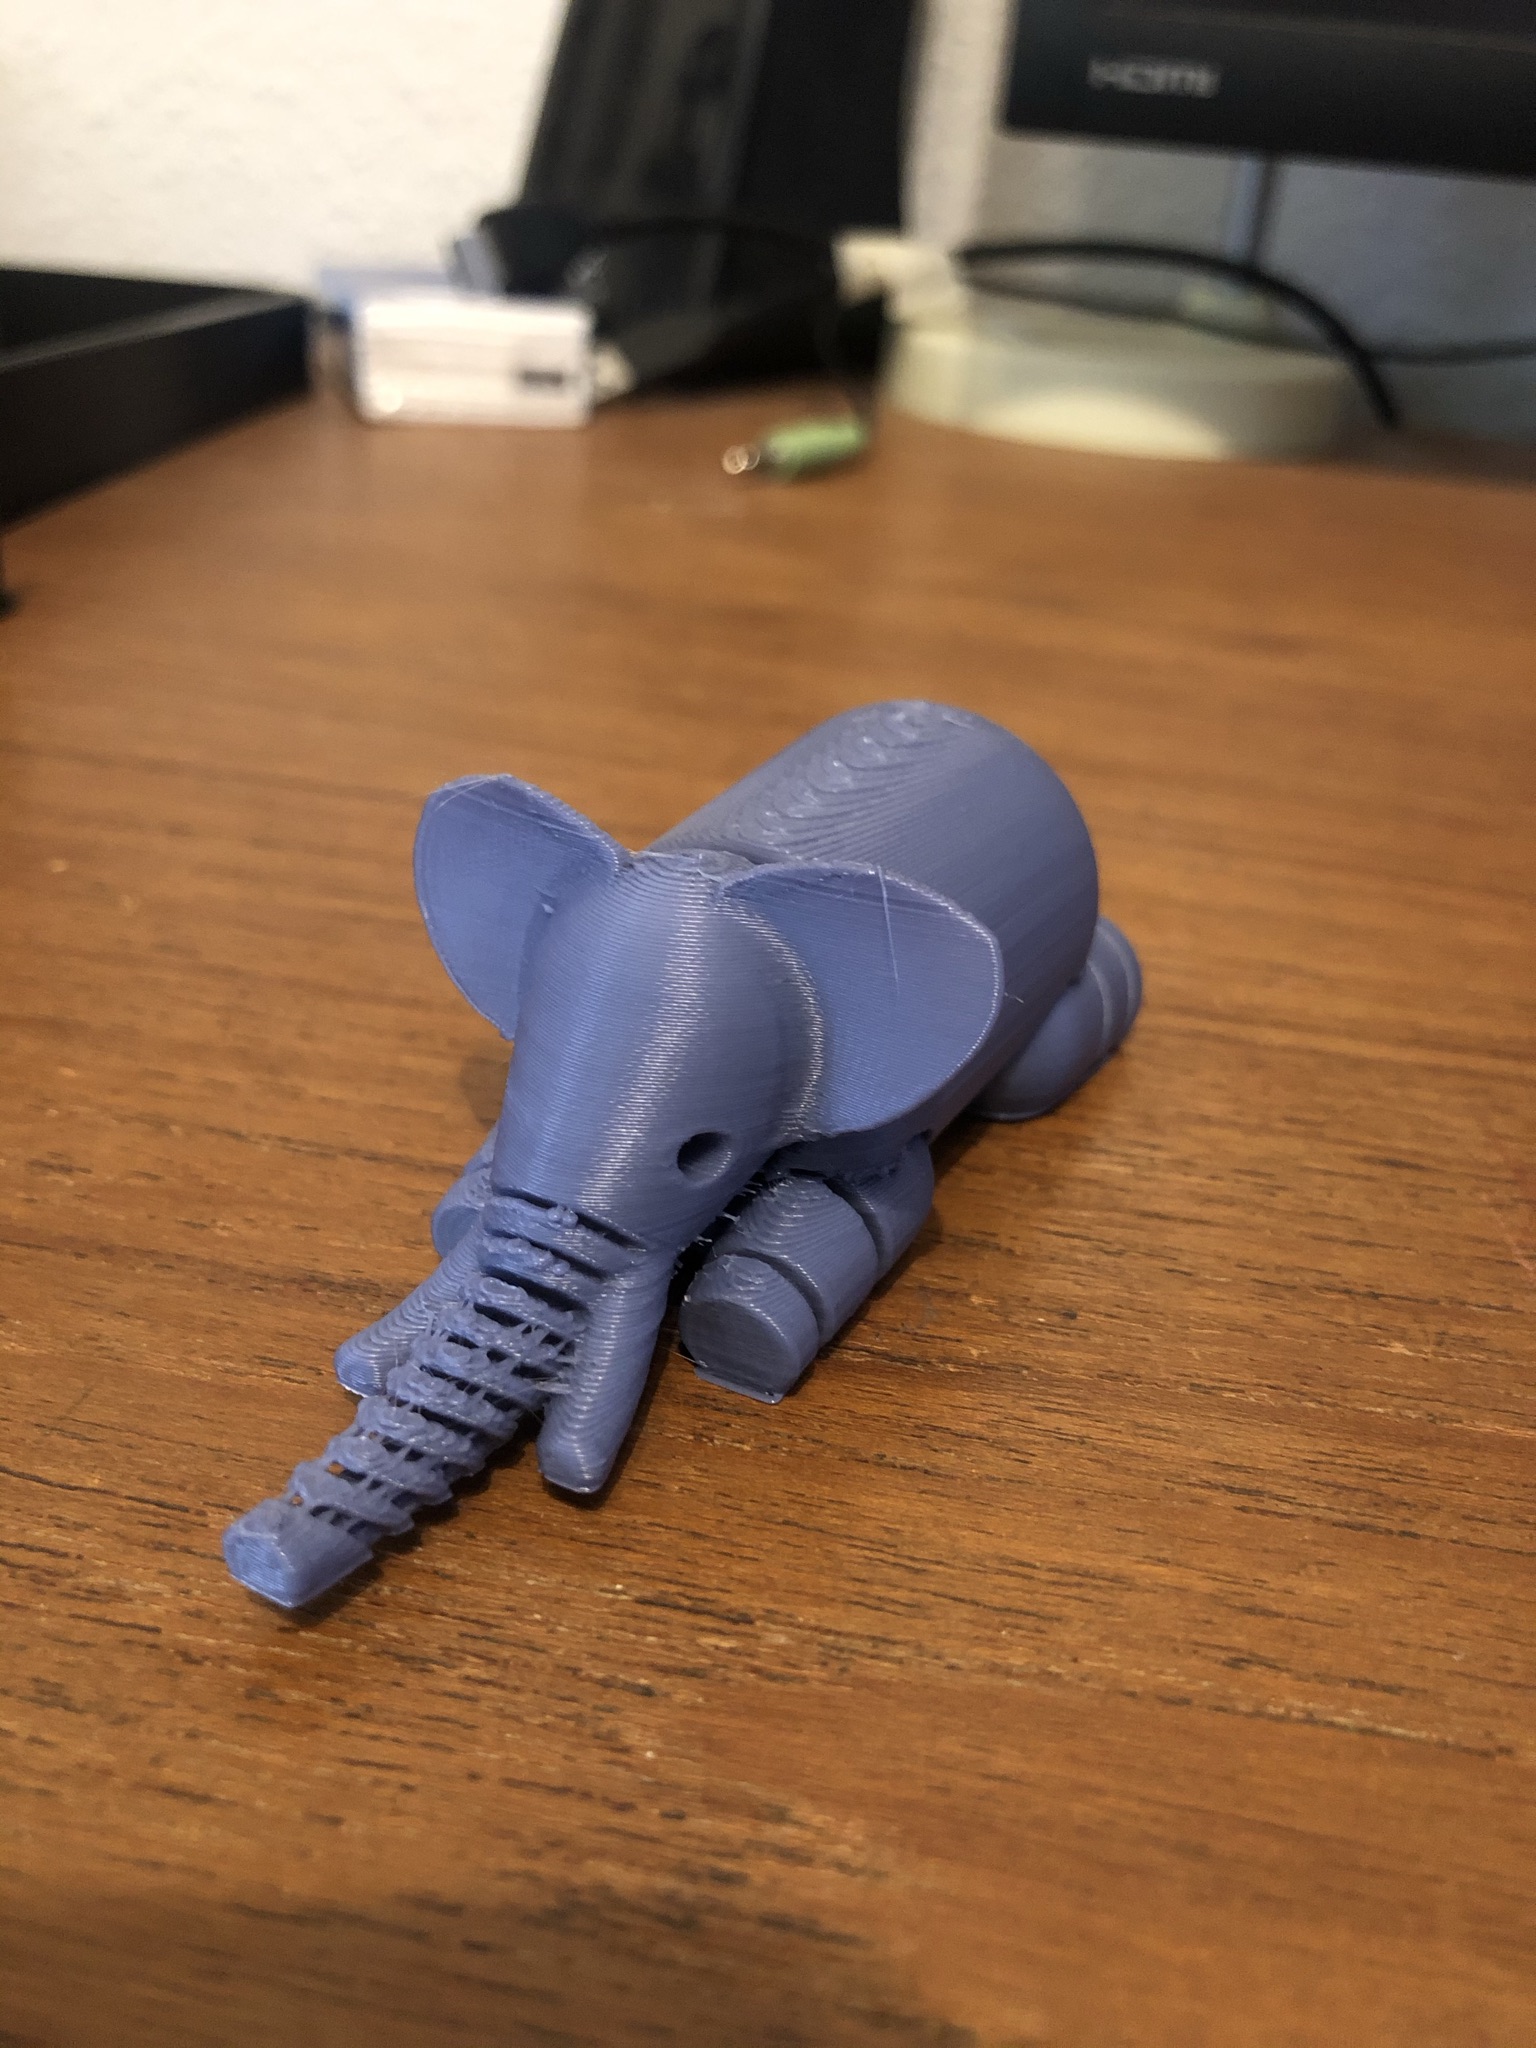
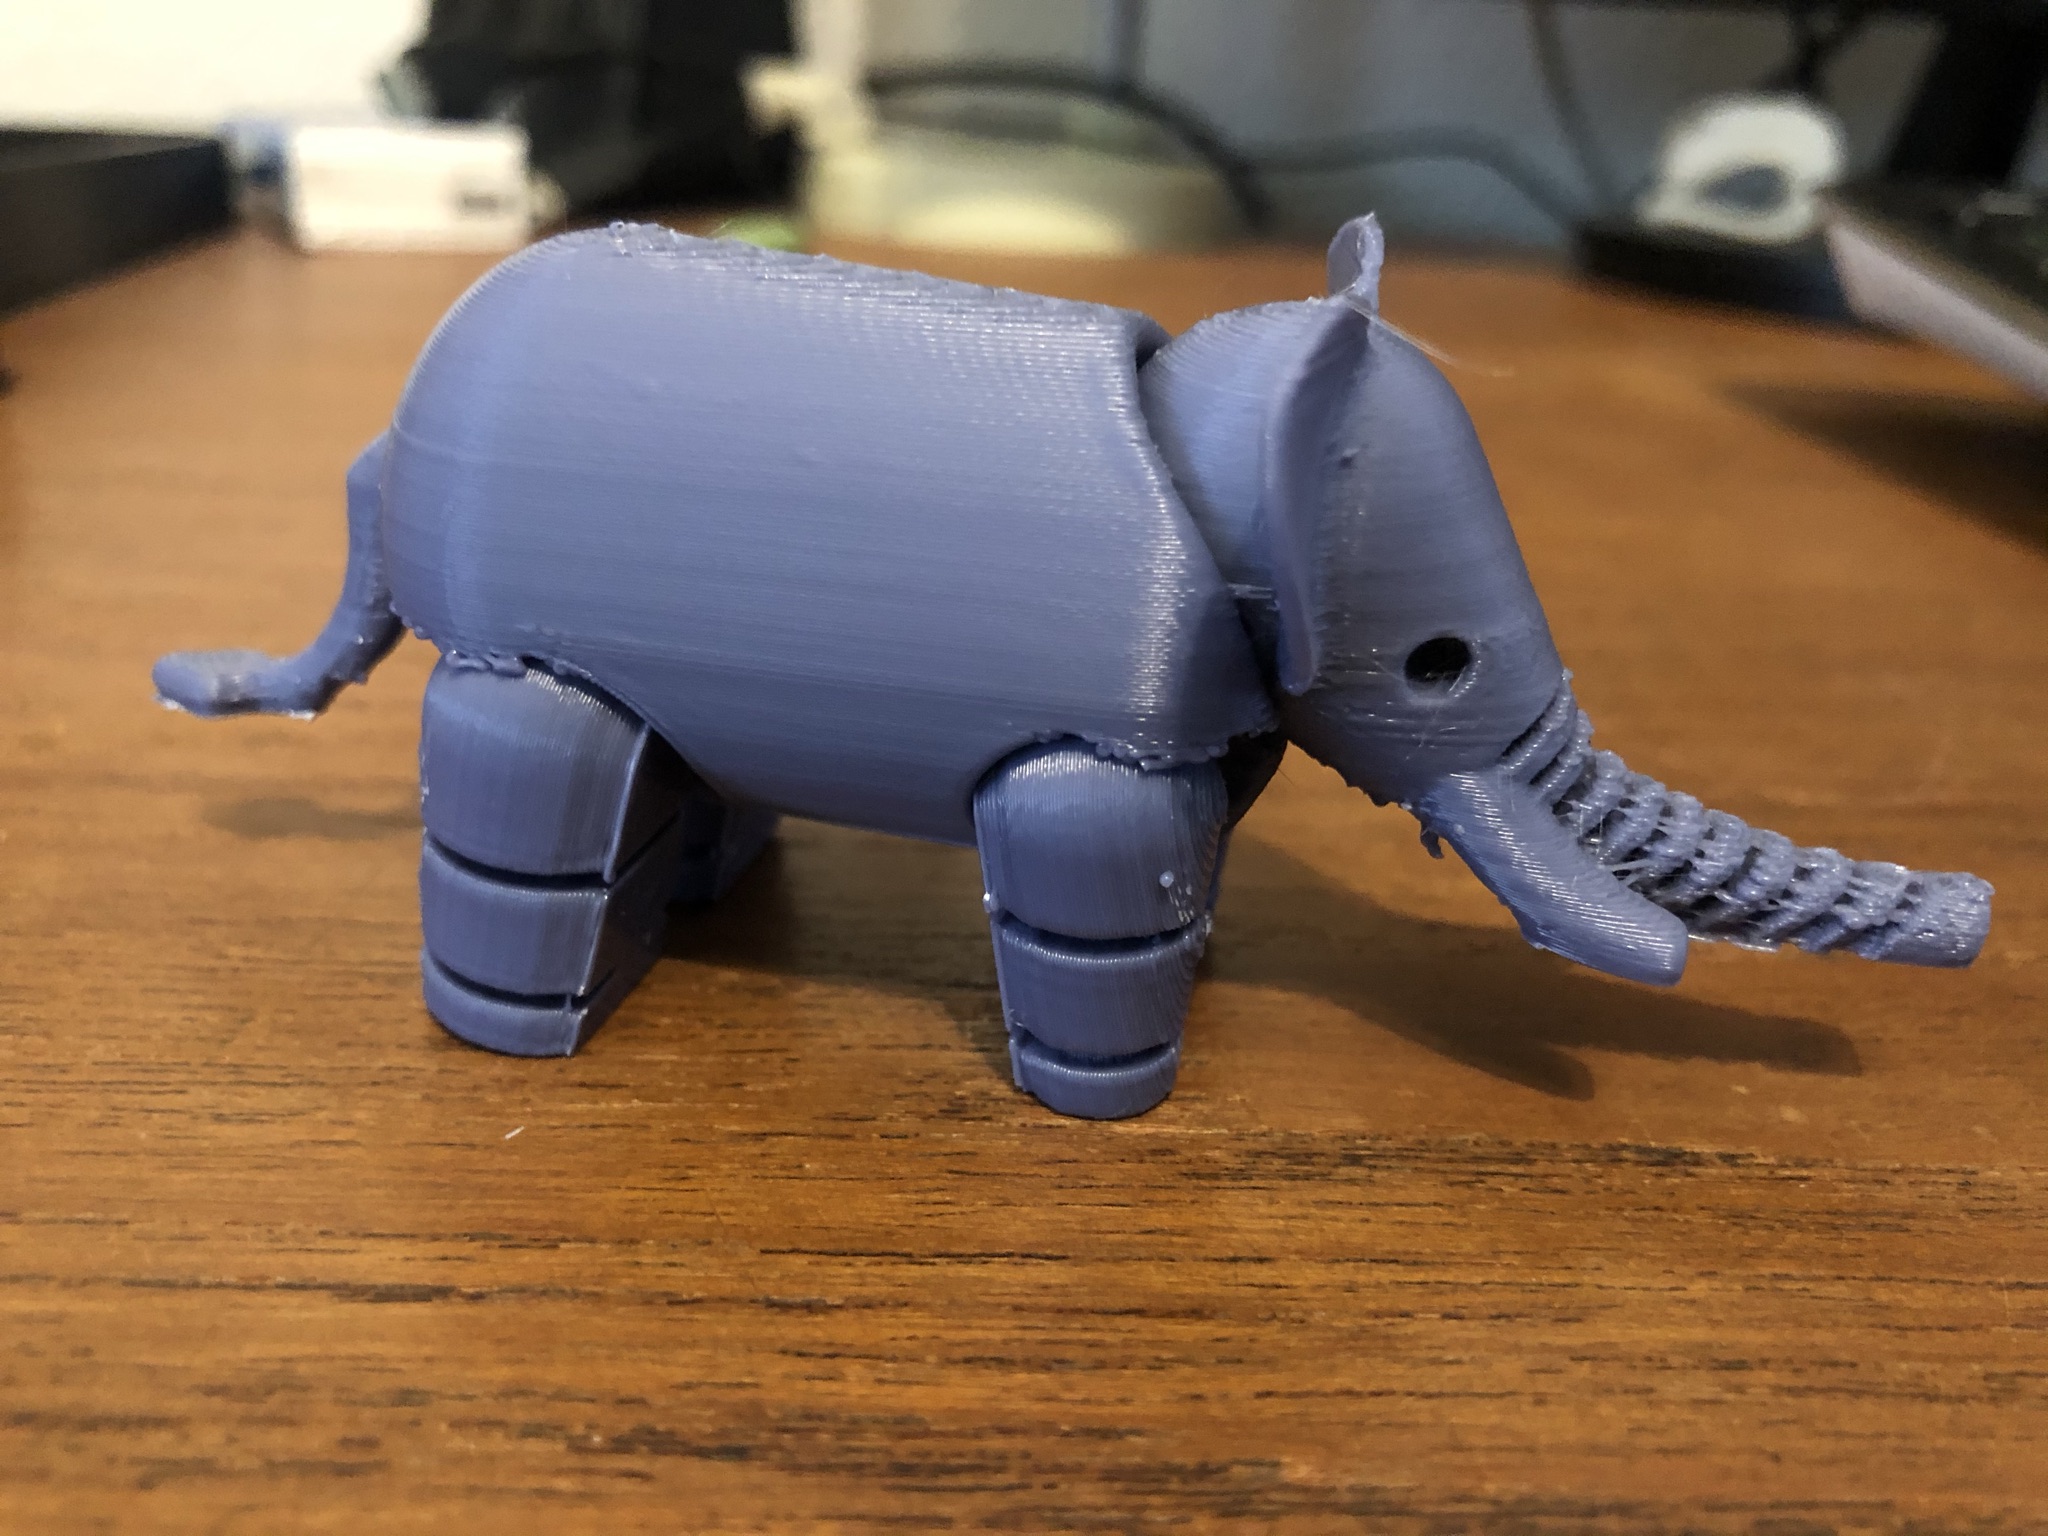
NOTES: This is an example of the the “0.2 – MEDIUM FAST” profile. Layers arevisible, but coherent and the quality have not suffered too much. A bit of ringing visible on the top part of the back, but nothing serious. The overhang suffered from the profile’s aggressive 60 mm/s bridge speed combined with the Delta Pro’s poor stock part cooling. However, they haven’t suffered so much as to render the elephant immovable. The horizontal hole expansion really plays a huge role here; with PrusaSlicer, this elephant would not be movable when printed at this speed. There’s a bit of stringing on the trout, but it’s light and easy to clean up. The blobs on the front legs are due to the overhangs having bled into that area. For most projects, the profile will work fine as is – but for things with overhangs like this, slow down the bridge speed to 40 mm/s and you’ll see significantly improvements in the overhang quality.

Link to STL

Model printed at 114.68% size (7.0 cm height).